pwdIntroduction to Bash
pwd: Find out where we are
After installing and starting the terminal, let’s orient ourselves by typing our first command, pwd, into the terminal and pressing enter.
pwd prints the location of the current working directory and tells you where exactly you are in the file system. When we start our terminal we typically start from what is called our home directory.
Your home directory will be something like /Users/YourUserName but the path might be slightly different depending on your operating system. Below you find some hints to orient yourself better for different terminal interfaces/operating systems:
For MAC users:
- The home directory should be
/Users/YourUserName - To access the current folder in Finder you can try using
open . - Your desktop should be here
/Users/YourUserName/Desktop
For Mobaxterm users:
- Your home directory is
/home/mobaxterm - By default this home directory is in a temporary folder that gets deleted every time you exit Mobaxterm, To give this folder a persistent home, do the following:
- Settings –> Configuration –> General
- In General set Persistent home directory to a folder of your choice
- To access the current folder in the file explorer you can type
explorer.exe . - The path to the desktop should something like this
/mnt/c/Users/YourUserName/OneDrive/Desktopor/mnt/c/Users/YourUserName/Desktop
For WSL2 users:
- The home directory is
/home/YourUserName - To access the current directory in the file explorer you can type
explorer.exe . - The path to the desktop would be something like this
/mnt/c/Users/YourUserName/OneDrive/Desktopor/mnt/c/Users/YourUserName/Desktop
Accessing the Uva OneDrive folder:
To access the OneDrive Uva folder, you need to add quotes between the absolute file path since bash does otherwise not know what to do with the space in the file name, i.e. cd "/mnt/c/Users/UserName/OneDrive - Uva". This is also a good example for why you normally do NOT want to add spaces in your filepath.
ls: List the contents of a directory
Now that we know where we are, let’s find out what files and folders exist in our home directory. For this you can use the ls command, which allows us to list all the contents of the directory you are currently in:
lsIn my case this returns something like this (and this will look different for your current directory):

The colors will look different depending on the CLI you use but in the example above you see a list of files (in bold text) and folders (green-highlighted text) that can be found in my current directory.
Since this output can easily become over-whelming if we deal with a lot of files and folders, lets look a bit closer into how we can optimize our commands by looking at the general structure of a command.
The structure of a command
A command generally consists of three elements, the command itself and some optional options and arguments:

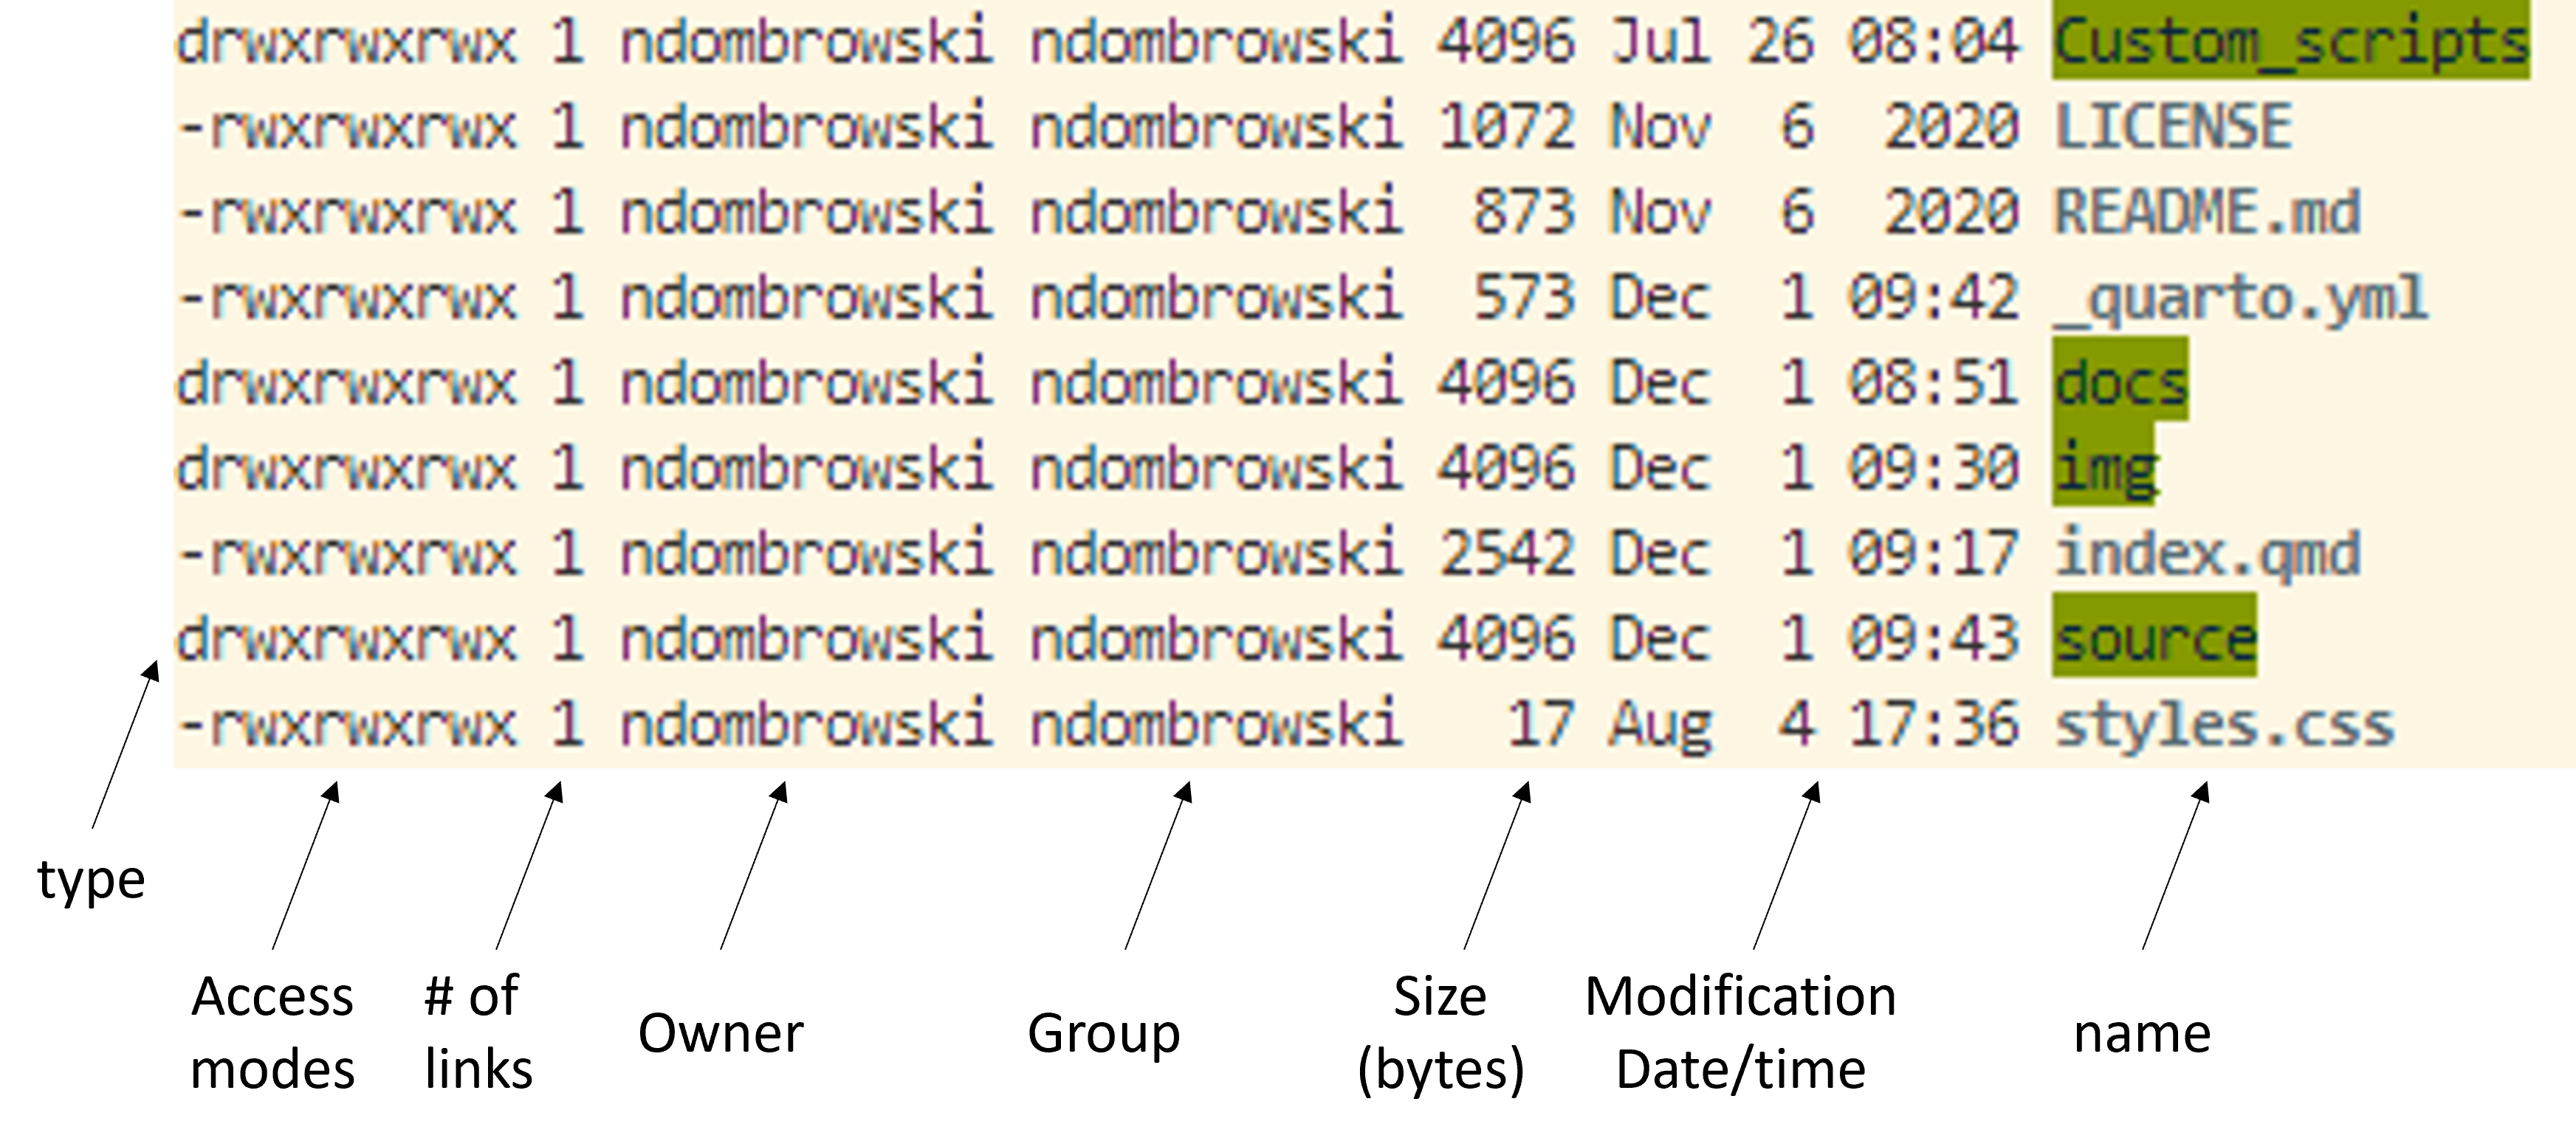
Understanding better what a command looks like, let’s use the ls command together with the option -l. This option results in ls printing the content of a folder in what is called a long listing format.
ls -lAfter running this, we see our files and folders again but in a long format, which gives more detailed information and structures our output a bit better. In the example below we can see that we now print additional information about who owns the files (i.e. access modes), how large the files are, when they were last modified and of course the name:
Getting help
If you want to know what options are available for a command (or software tool) it is always a good idea to check out the manual. In most of the cases you can do this with:
man lsYou exit the manual by pressing q.
In case you want to check what a program does or what options there are, depending on the program there might be different ways to access the manual. The most common ways are:
man lsls --helpls -h
cd: Move around folders
Most of the time you do not want to perform your analyses in the home directory but in a dedicated folder for your project. To get started, we will learn about the cd command that allows us to move around the file system.
The file system is a hierarchical system used to organize files and directories. It is a tree-like structure that starts with a single directory called the root directory, which is denoted by a forward slash (/). All other files are “descendants” of the root. To move from the root into other folders, we can go via the descendants to, for example, reach the john folder as follows: /users/john.
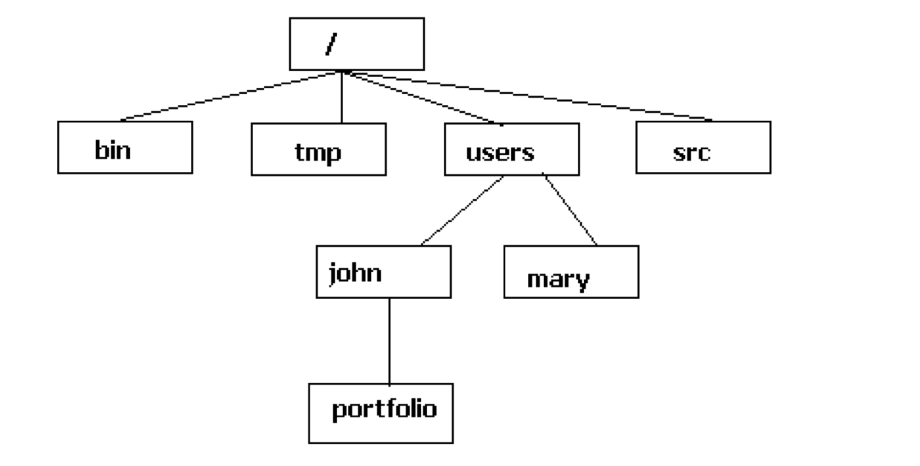
If we specify the location of a folder or file starting from the root directory, we use what is called an absolute path. If we specify the location relative to our current directory, such as our home directory, we use what is called a relative path.
To start moving around the file system, let’s begin by moving relative to our working directory by moving into any of the folders that you saw listed after you have used ls -l. In my case I want to move into the source directory. If you run this, choose any folder you see after running the ls command:
cd source/If you use pwd after moving around directories, you should see that a different location is printed to the screen.
We can also move back to our original directory using cd ... This command will move us back one directory (and move us out of the source and back into the home directory).
cd ..We can also move around multiple levels. In the example below, I am going into the source folder, then back to the home directory and then into the docs folder.
cd source/../docsAnother useful way to move around quickly is using the tilde symbol, ~, which can be used as a shortcut to move directly into our home directory from wherever you are on the file system:
cd ~Explore your current location with pwd and ls and move around with cd and try to get used to these three commands. If you are more comfortable, try finding your Deskop based on the tip in the section about pwd.
mkdir: Make new folders
Now that we know how to explore our surroundings, let’s make a new folder in which we start our data analysis. For this we use the mkdir command.
To do this, we will first move into our home directory and then create and move into a new folder called data_analysis as follows:
#go into the home directory
cd ~

#in the home directory make a new folder and name it data_analysis
mkdir data_analysis

#check if new folder was generated correctly
ls

#move into the newly generated folder
cd data_analysis

#check if we correctly changed our location
pwdNotice, how in the example below I added the commands to run as well as some explanation about what I did?
Here, I used a specific character # in front of a line of text to denote the beginning of a single-line comment. Anything coming after the character is considered a comment and won’t be executed by the shell.
In the above example I definitely commented the code too much as my comments basically duplicate the code and that should be avoided, however, it is useful to add comments in code to ensure that the purpose of the code is clear to others.
You could, for example, add a comment above functions to describe what the function does and you can also add comments to “tricky” code where it is not immediately obvious what you are trying to do. Basically, you want to add comments to any section where you think that the future you might get confused a month later.
Here you find some examples for python and R but the same logic applies when writing code for bash, some examples for that can be found here.
Most command-line interpreters allow to automatically fill in partially typed commands, file paths or file names.
So instead of having to type out data_analysis completely when changing the directory, we can let the interpreter do the work for us.
To do this, start from the home directory (or wherever you ran the mkdir command) and type cd data_ and press the Tab-key on your keyboard. The cli should have auto-completed the folder name automatically.
If there are multiple options, such as data and data_analysis, the cli can not autocomplete the folder name, however, by pressing Tab twice you will see all options to extend the name.
While we talk about being lazy: If you press the arrow-up key on your keyboard you can cycle through commands you already ran and this often times can be useful to recycle code snippets (i.e. if you are trying certain settings and want to quickly change a small section of your code).
wget: Download data
Next, let’s download our sequencing data, called seq_project.tar.gz using wget. In the command below we add the option -P to specify into which folder we want to download the data.
#download data using link provided by the sequencing center on 23.01.2023
wget https://github.com/ndombrowski/cli_workshop/raw/main/data/seq_project.tar.gz
In this example, you can also see how I documented my code here in order to add some more specifics about where the link came from to help future me in case I, for example, need to look for some e-mails about the data later on.
For Mac users wget is not installed by default. If you do not want to install it, run the following:
curl -LO https://github.com/ndombrowski/cli_workshop/raw/main/data/seq_project.tar.gz- Check with
lsif the file was downloaded correctly - Check the manual if there are extra options that we can use for
lsto check the file size (advanced)
Click me to see an answer
#question 1:
ls -l

#question 2:
ls -lhcp: Copying data
When working with many files a good folder structure is essential to keep track of our files. To keep our project folder organized, we will copy the seq_project.tar.gz file we just downloaded into a special folder that we will call data.
#make a folder for our raw data
mkdir data

#move the tar.gz file into the data folder
cp seq_project.tar.gz data/

#check what happened
ls -l
ls -l data
When running the two ls commands, we see that we now have two copies of seq_project.tar.gz, one file is in our working directory and the other one is in our data folder. Copying large amounts of data is not ideal since we will use unneccassary space. However, we can use another command to move the tar folder into our data folder.
mv: Moving data
mv is the command we can use to move data across locations without generating a copy. We run it as follows:
#move the tar.gz file into the data fodler
mv seq_project.tar.gz data/

#check what happened
ls -l
ls -l data
Notice that mv will move the tar file and, without asking, overwrite the existing tar file we had in the data folder when we ran cp. This means for you that if you run move its best to make sure that you do not overwrite files by mistake.
tar: Work with tar files
The data we downloaded is provided as a tar file:
- tar is short for Tape Archive, and sometimes referred to as tarball
- The TAR file format is commonly used when storing data
- TAR files are often compressed after being created and then become TGZ files, using the tgz, tar.gz, or gz extension.
We can decompress the data into our data folder as follows:
tar -xvf data/seq_project.tar.gz -C dataThe options we use with the tar command are:
xtells tar to extract files from the archivevdisplays verbose information while creating the tarballfspecifies the file nameCtells tar to change directory (so the package content will be unpacked there)
If you ever want to generate a tarball you can do the following:
tar -cvzf my_tarball.tar.gz folder_to_tarThe options we use are:
ccreate an archive by bundling files and directories togetherzuse gzip compression when generating the tar file
- After extracting the tarball use
lsto explore the content of the folder we just extracted. Ensure that you explore the content of potential sub-directories. - Find the path for at least one sequence file that ends on fastq.gz. Hint: to make your life easier, check the
Tip: Command-line completionabove to not have to type every single word.
Click me to see an answer
#question 1:
ls -l data/seq_project

#question 2:
ls -l data/seq_project/barcode001_User1_ITS_1_L001/rm: Remove files and folders
To remove files and folders, we use the rm command. We want to remove the seq_project.tar.gz file since we do not need it anymore once we have extracted the data:
#rm a file
rm data/seq_project.tar.gz

#check if that worked
ls -l data
If we want to remove a folder, we need to tell rm that we want to remove folders using an option. To do this, we use -r , which allows us to remove directories and their contents recursively.
Unix does not have an undelete command.
This means that if you delete something with rm, it’s gone. Therefore, use rm with care and check what you write twice before pressing enter!
Wildcards
After we have explored the folder with our sequencing data with ls, we have seen that data/seq_project contains 4 folders, 2 folders for two different users who each generated two samples.
You also might have also noticed that it gets tedious to figure out how many files are in each folder because we would need to run ls on each single folder and view its contents individually.
Luckily, the shell provides special characters to rapidly specify groups of filenames or patterns. Wild-cards are characters that can be used as a substitute for any class of characters in a search.
The * wildcard is the wildcard with the broadest meaning of any of the wildcards, it can represent 0 characters, all single characters or any string of characters. It allows us to list all files in the seq_project folder as follows:
ls data/seq_project/*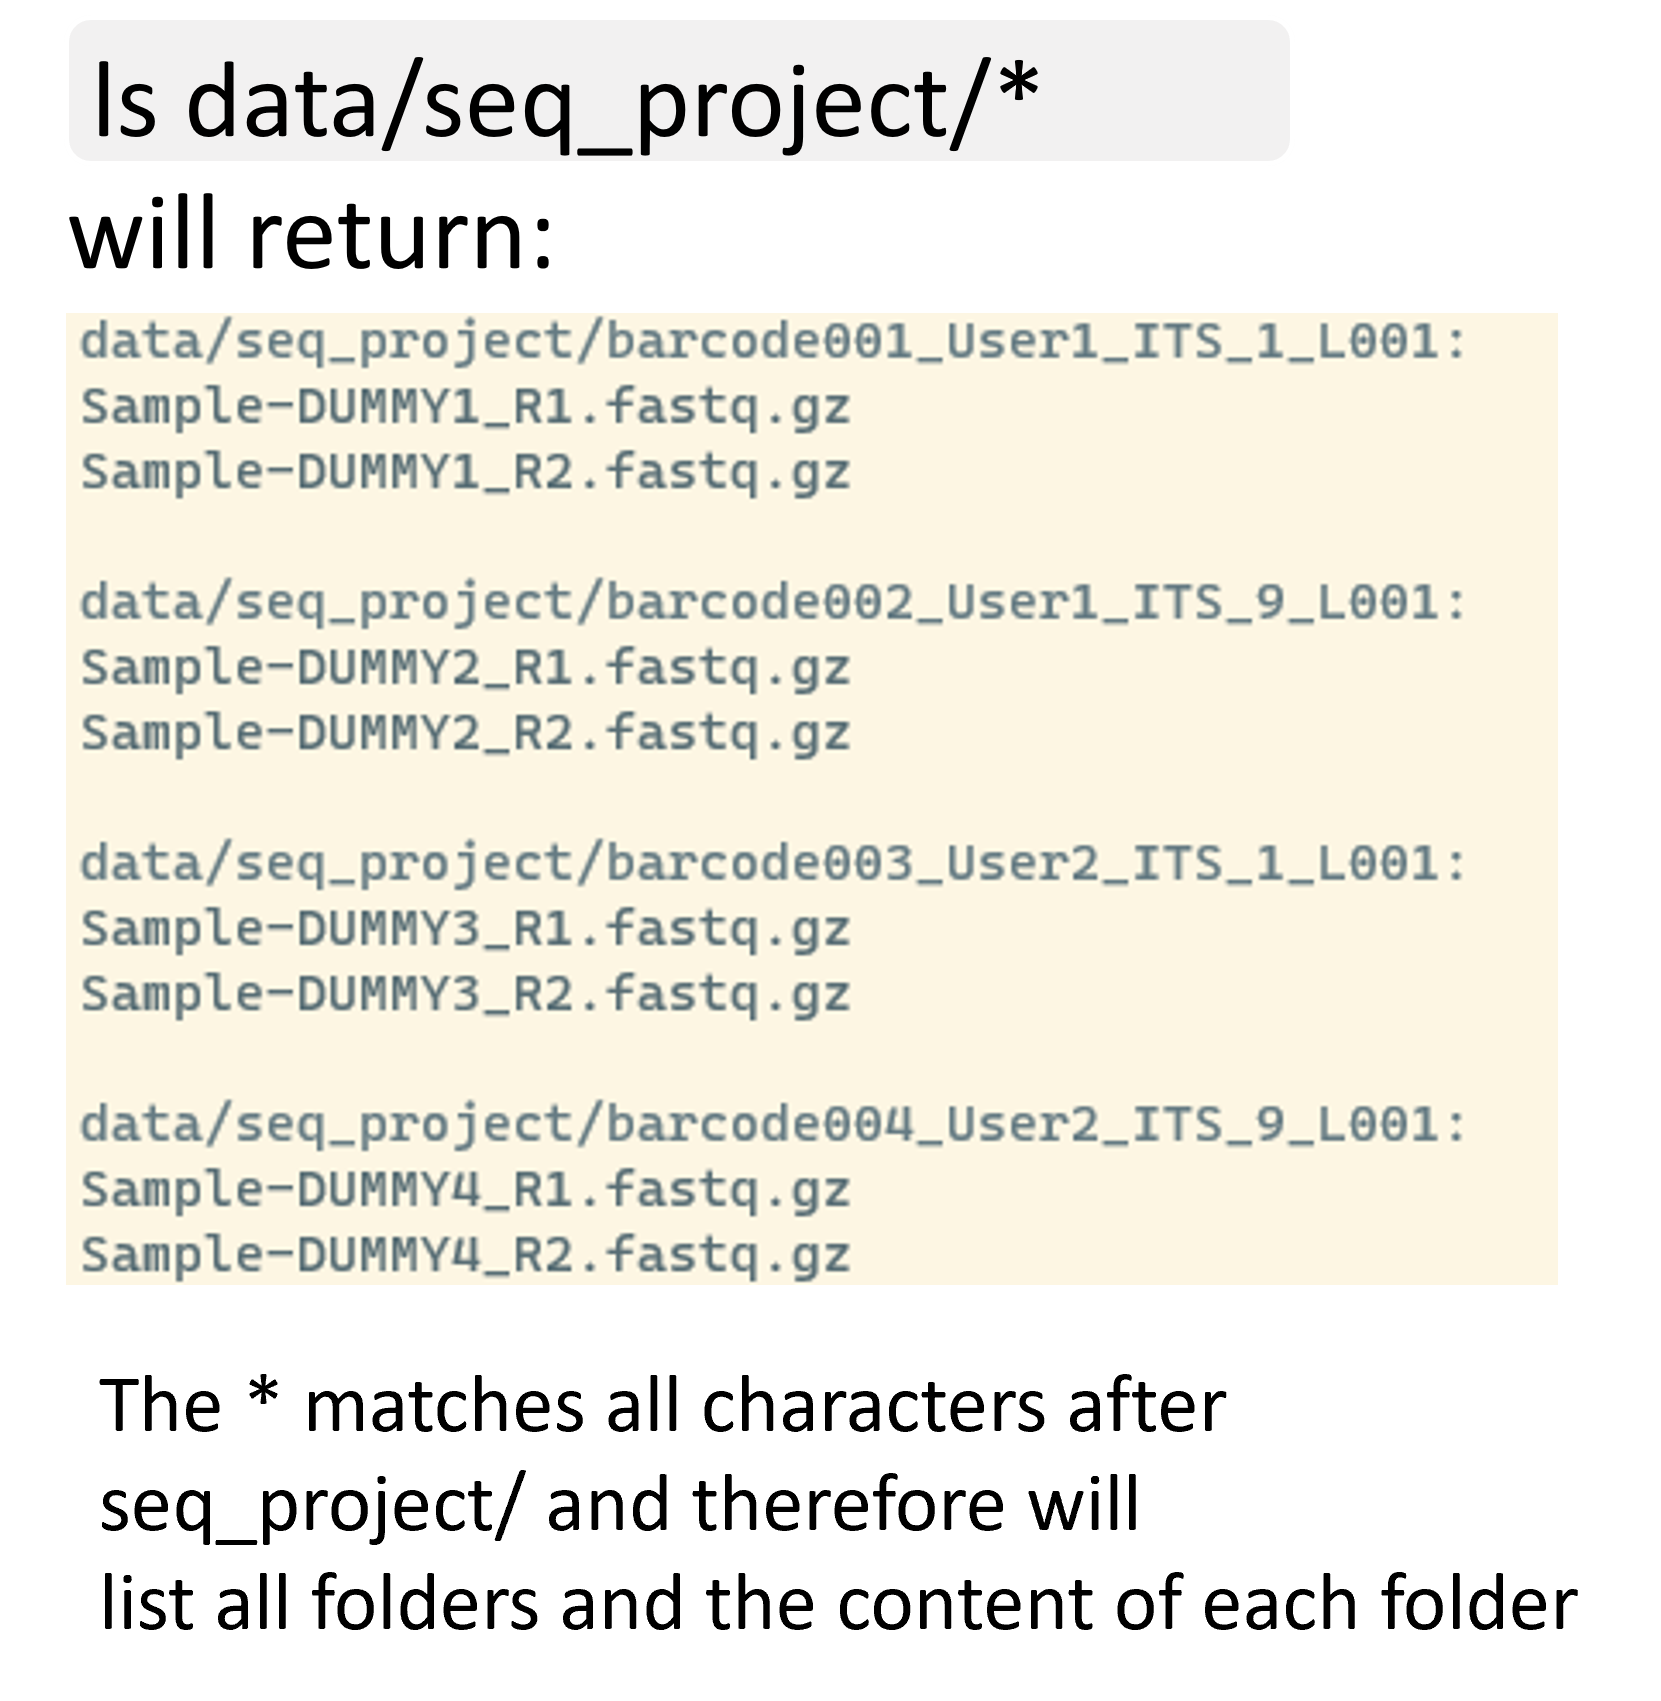
You should have seen before that the sequencing files all end with .fastq.gz we can make this command a bit more specific and at the same time make the output a bit more readable:
ls data/seq_project/*/*.gz
If we wanted to print the absolute and not the relative path, we could do the following (beware that the absolute path will be slightly different depending in you system):
ls /home/User_name/data/seq_project/*/*.gzNow we can easily see for each folder how many files we have.
- Use a wildcard to list files for barcode001 only
- Use a wildcard to only list R1 (i.e. forward) files
- Use a wildcard to copy all R1 files into a new folder, call this new folder
R1_files. Uselsto confirm if you copied the right files - To avoid duplicates, remove the R1_files folder from question 3 after you have ensured the command you used worked
Click me to see an answer
#question 1:
ls data/seq_project/barcode001*/*gz

#question 2:
ls data/seq_project/*/*R1*

#question 3:
mkdir R1_files
cp data/seq_project/*/*R1* R1_files
ls data/seq_project/*/*.gz
ls -l R1_files

#question 4:
rm -r R1_files
After solving question 2 you should see:

After solving question 3, we should see that all files still exist in its original location but are now also inside of the R1_files folder. Notice, how we can use wildcards together with other commands to easily reorganize our data?
* is not the only wildcard we can use and a full list can be found here.
Different wildcards can be useful in different contexts, not only only when listing files but also finding patterns in files. To make such searches as specific as possible there are different wildcards available. A few examples are:
The [0-9] wildcard = matches any number exactly once and allows us to extract a range of files.
ls data/seq_project/barcode00[0-9]*/*.gzThe [012] wildcard = matches 1 or 2 exactly once and allows us to extract a range of files.
ls data/seq_project/barcode00[12]*/*.gz[A-Z] matches any letter in capitals occurring once
[a-z]* matches any letter in non-capital letters occurring many times
ls data/seq_project/barcode001_User1_ITS_1_[A-Z]001/*.gzI/O redirection to new files
We have seen that by default our commands directly print the standard output to the terminal. For example, when we use ls the list of files and folders is printed to your terminal. However, we can also redirect the standard output to a file by using the > character.
For example, we might want to generate a list with all fastq files and can do this as follows:
ls data/seq_project/*/* > fastq_paths.txtExploring the content of text files
Next, let’s view the content of the list we just generated. Viewing the actual files we work with is often important to ensure the integrity of our data.
head: View the first rows of a file
head can be used to check the first 10 rows of our files:
head fastq_paths.txttail: View the last rows of a file
If you want to check the last 10 rows use tail:
tail fastq_paths.txtless: View the full file
less is a program that let’s you view a file’s contents one screen at a time. This is useful when dealing with a large text file (such as a sequence data file) because it doesn’t load the entire file but accesses it page by page, resulting in fast loading speeds.
less -S fastq_paths.txt- You can use the arrow Up and Page arrow keys to move through the text file
- To exit less, type
q
You can also edit the content of a text file and there are different programs available to do this on the command line, the most commonly used tool is nano, which should come with most command line interpreters. You can open any file as follows:
nano fastq_paths.txtOnce the document is open you can edit it however you want and then
- Close the document with
control + X - Type
yto save changes and press enter
wc: Count things
Another useful tool is the wc (= wordcount) command that allows us to count the number of lines via -l in a file. It is an useful tool for sanity checking and here allows us to count how many files we work with:
wc -l fastq_paths.txtAfter running this we see that we work with 8 files.
We could of course easily count this ourselves, however, if we work with hundreds of files its a quick and easy way to get an overview about how much data we work with.
One down-side of this approach is that to be able to count the number of files, we first need to generate a file in which we count the number of files. This (i) can create files we do not actually need and (ii) we use two commands while ideally we want to get the information with a single command.
Pipes
Pipes are a powerful utility to connect multiple commands together. Pipes allow us to feed the standard output of one command, such as ls as input into another command, such as wc -l, and as such combine multiple commands together.
Therefore, let`s use ls to first list all fastq files and then pipe the output from ls into the wc command in order to count with how many files we work with:
ls data/seq_project/*/* | wc -lWe should see again that we work with 8 files, but now we did not have to generate an intermediate text file and have a more condensed command.
- Use ls and wc to count how many R1 files we have
- Count how many R2 files we have
- Count how many files were generated for User1
Click me to see an answer
#question 1: We see 4 files
ls data/seq_project/*/*R1*gz | wc -l

#question 2: We see 4 files
ls data/seq_project/*/*R2*gz | wc -l

#question 3: We see 4 files
ls data/seq_project/*_User1_*/*gz | wc -l
Checking whether we have the same number of R1 and R2 files is a good sanity check, to ensure that we have received all the files from the sequencing center whenever we generate paired-end sequencing data.
cut: Extract elements from strings
Remember, how we stored a list of sequencing files and the path leading to these files (relative to our home directory in a text file called fastq_paths.txt)?
Imagine that we only wanted to have a list of files but not the path, how would we do that?
There are different ways to do this, the simplest one is to use cd and go into the folder with our sequence files and generate a list in there.
However, another way in which we do not have move around (and learn some other concepts) is to use the cut command. cut allows us to separate lines of text into different elements using any kind of delimiter, for example the / that we use in the file path. To ensure that / is seen a separator we use the -d option and with -f4 we tell cut to print the fourth element of each separated field.
head fastq_paths.txt

#extract the file name (i.e. the fourth field when using a / separator)
cut -f4 -d "/" fastq_paths.txt

#do the same as above but this time save the output in a new file
cut -f4 -d "/" fastq_paths.txt > fastq_files.txt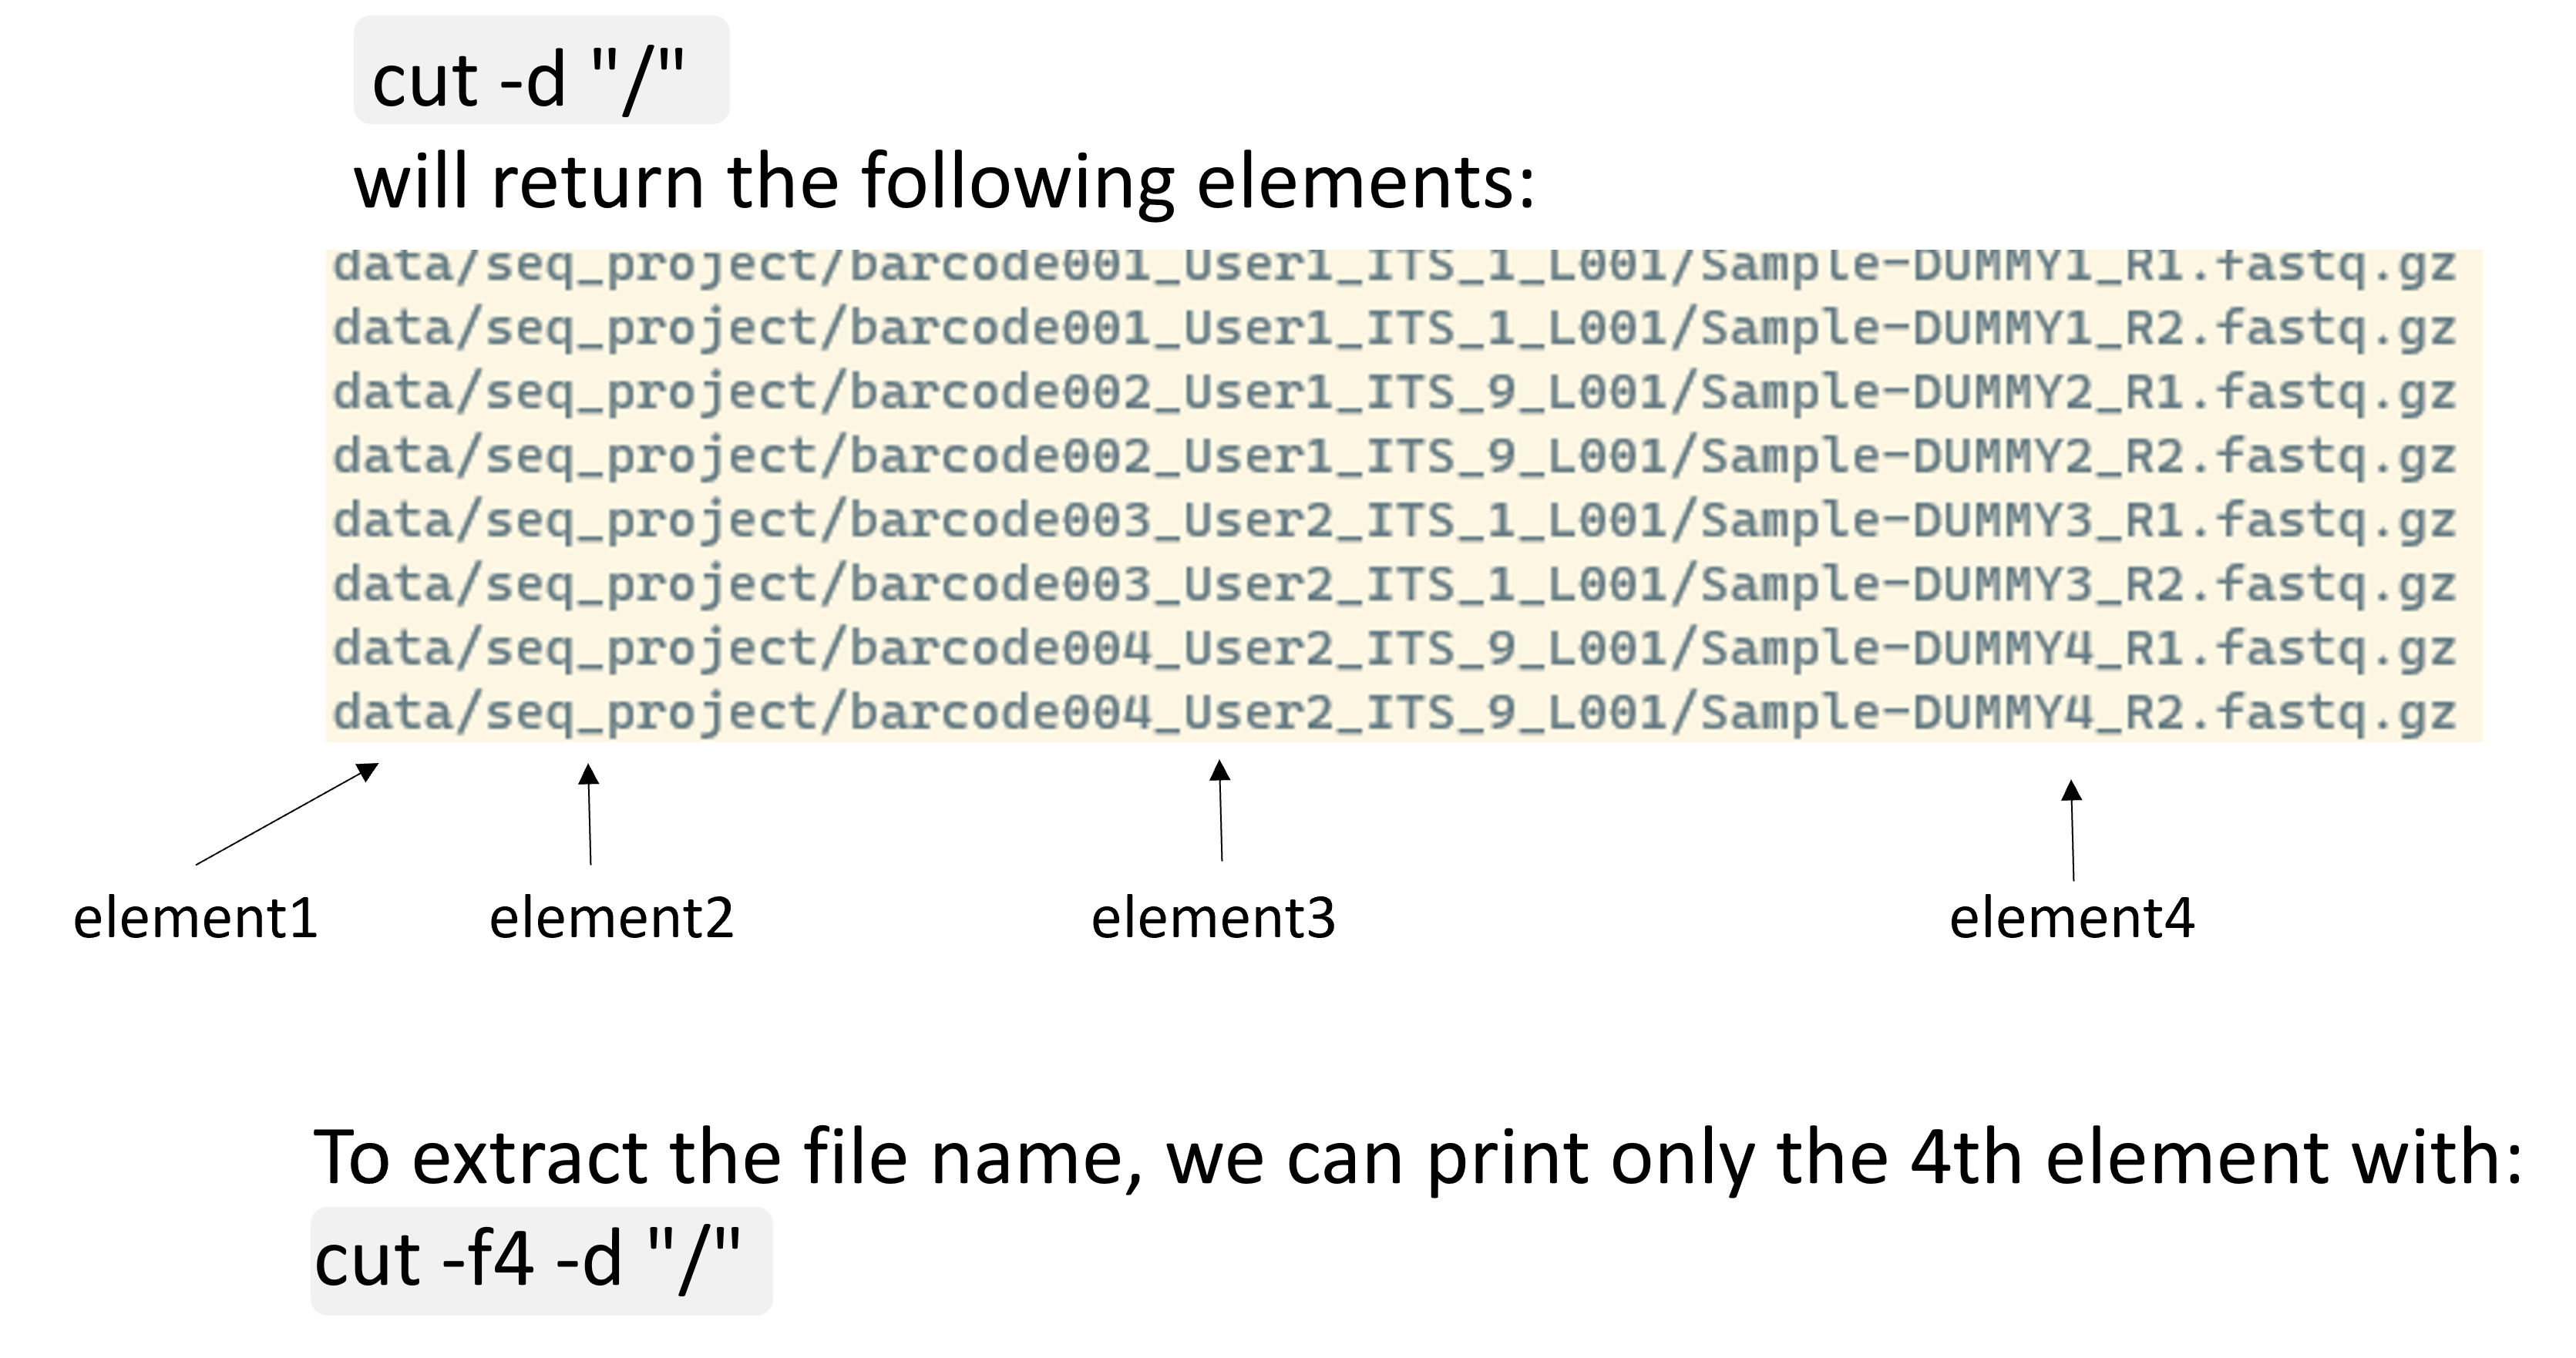
We can also combine this with pipes in order to extract different pieces of information. Let’s assume we start with extracting a folder name, such as barcode002_User1_ITS_9_L001, and from that we want to extract some other information, such as the barcode IDs. We can easily do this as follows:
cut -f3 -d "/" fastq_paths.txt | cut -f1 -d "_"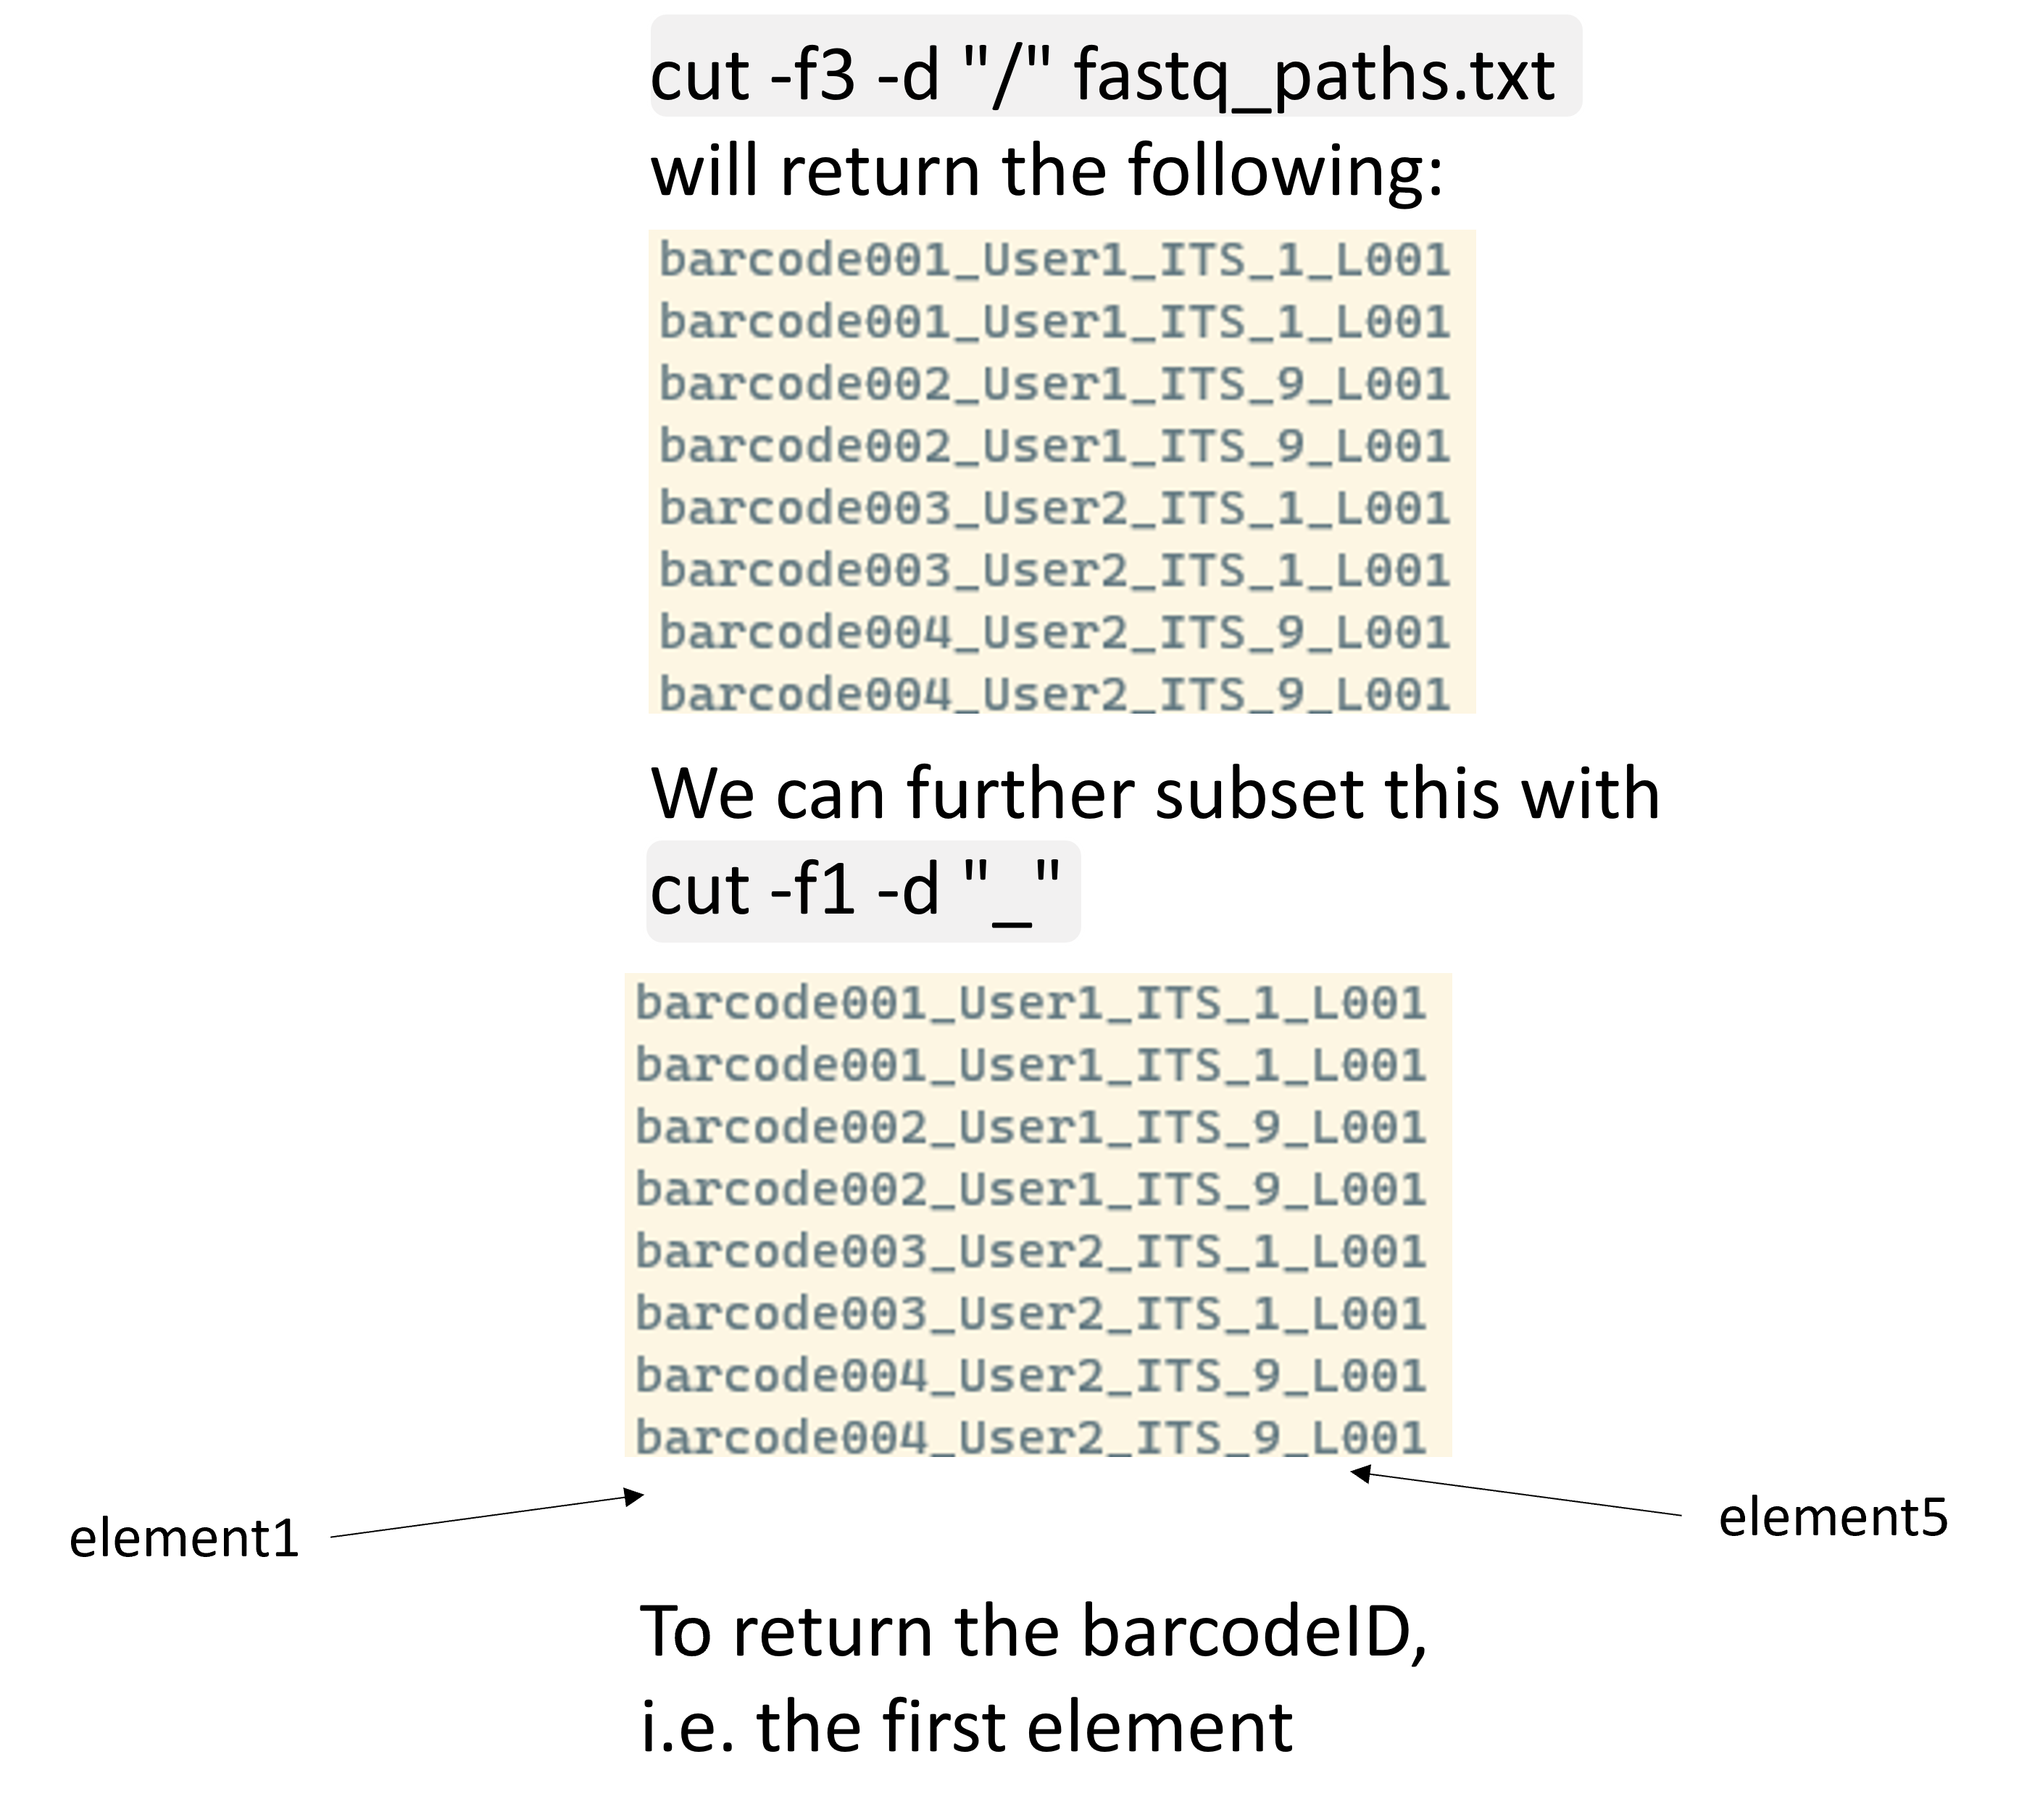
Nice, we now only have a list with barcodes. However, its not yet ideal since we have duplicated barcodes. If you want to extract this information for some metadata file this is not ideal and we need to get to know two more commands to make this work:
sort and uniq: Create unique lists
sort: sorts lines in a file from A-Zuniq: removes or finds duplicates . For this command to work you need to provide it with a sorted file
Let’s first ensure that our barcode list is sorted to then extract only the unique information:
cut -f3 -d "/" fastq_paths.txt | cut -f1 -d "_" | sort | uniq- Use cut on fastq_paths.txt to print the folder names in which the fastq.gz files reside (i.e. barcode001_User1_ITS_1_L001)
- Print the folder names as in 1 and then extract the user names from this list
- Ensure that when running the code from 2 that we print a unique list of user names
Click me to see an answer
#question 1:
cut -f3 -d "/" fastq_paths.txt

#question 2:
cut -f3 -d "/" fastq_paths.txt | cut -f2 -d "_"

#question 3:
cut -f3 -d "/" fastq_paths.txt | cut -f2 -d "_" | sort | uniqcat: Read and combine files
cat can do different things:
- Create new files
- Display the content of a file
- Concatenate, i.e. combine, several files. For concatenation we can provide
catwith multiple file listed after each other or use a wildcard.
To view files we do:
cat fastq_paths.txtTo combine files we do:
#combine files
cat fastq_paths.txt fastq_files.txt > combined_files.txt

#view new file
cat combined_files.txtFastq.gz files can easily be combined using cat and while this is not strictly necessary in our case, you might need to do this with your sequence files in the future. For example if you sequenced a lot of data and for space reasons the sequencing center send you multiple files for a single sample.
- Using wildcards and cat, combine all R1 fastq.gz files into a single file
- Use ls to judge the file size of the individual R1 files and the combined file to assess whether everything worked correctly
Click me to see an answer
#question 1:
cat data/seq_project/*/*R1.fastq.gz > combined_R1.fastq.gz

#question 2:
ls -lh data/seq_project/*/*R1.fastq.gz
ls -lh combined_R1.fastq.gz
If you compare the two numbers generated for question 2, you should see that the combined.fastq.gz file is roughly the sum of the individual files.
Exploring the content of compressed fastq files
- View the first few rows of any one of the fastq.gz sequence files
- Does this look like a normal sequence file to you?
Click me to see an answer
head data/seq_project/barcode001_User1_ITS_1_L001/Sample-DUMMY1_R1.fastq.gzAfter running this command you will see a lot of random letters and numbers but nothing that looks like a sequence, so what is going on?
gzip: (De)compress files
After downloading and exploring the content of the downloaded folder, you have seen that the file we downloaded ends with gz. This indicates that we work with a gzip-compressed file. gzip is a tool used to (de)-compress the size of files.
In order to view the content of compressed files, we sometimes need to de-compress them first. We can do this using the gzip command together with the decompress -d option:
gzip -d data/seq_project/barcode001_User1_ITS_1_L001/Sample-DUMMY1_R1.fastq.gz

head data/seq_project/barcode001_User1_ITS_1_L001/Sample-DUMMY1_R1.fastq
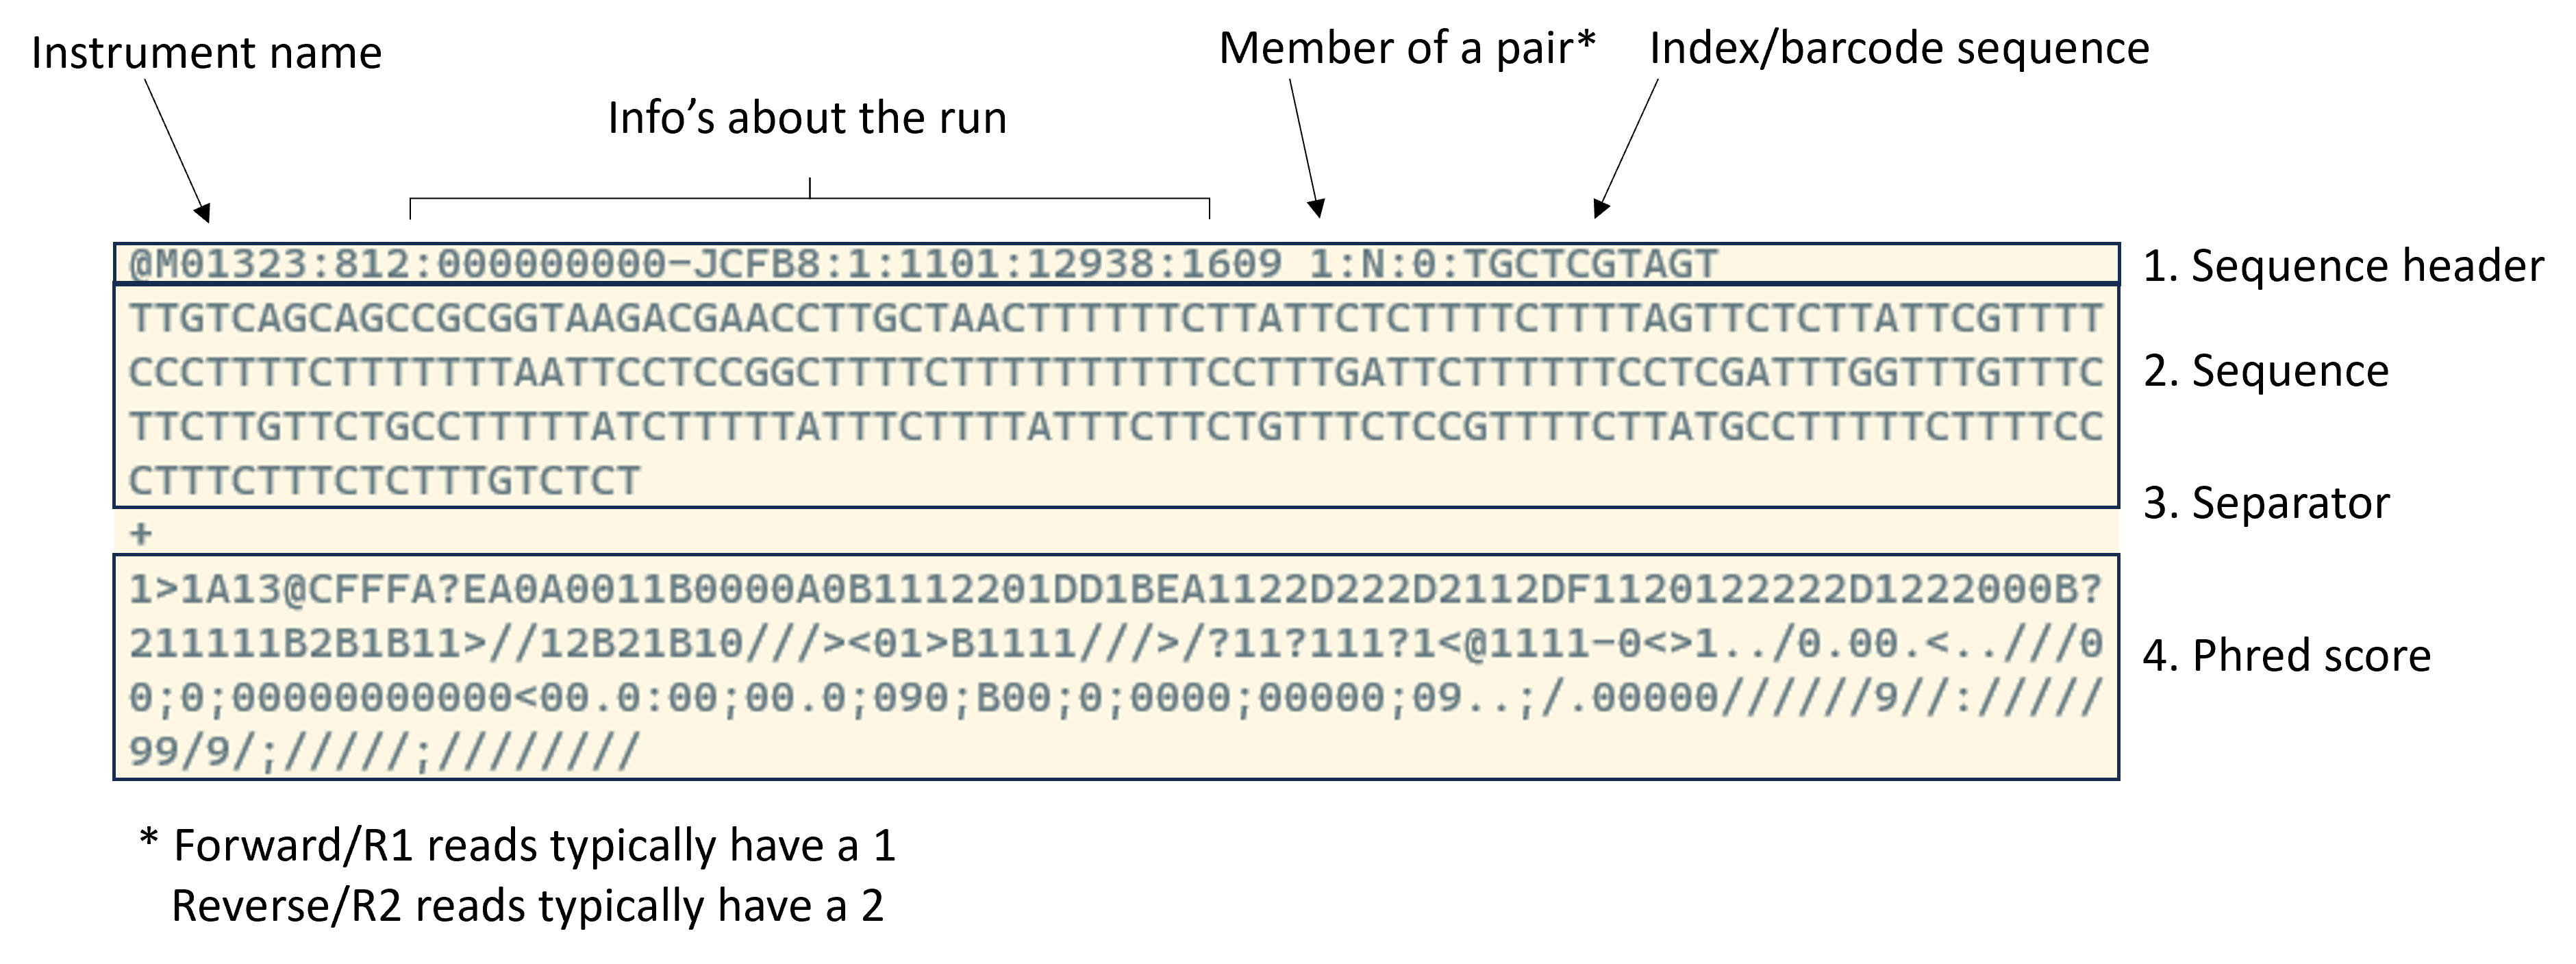
After running this, we finally see a sequence and some other information. Notice that for fastq files we always should see 4 rows of information for each sequence as shown below:
- After running the gzip command above, make a list of each sequence file with
ls - Use
lswith an option to also view the file size and compare the size of our compressed and uncompressed files.
Click me to see an answer
#question 1:
ls -l data/seq_project/*/*

#question 2:
ls -lh data/seq_project/*/*
We see that our file has a file size of about ~25M after compression while the compressed files are around ~5M.
When working with sequencing files the data is usually much larger and its best to keep the files compressed to not clutter your computer.
To keep our files small its best to work with the compressed files. If we want to compress a file, we can do this as follows:
gzip data/seq_project/barcode001_User1_ITS_1_L001/Sample-DUMMY1_R1.fastq

ls data/seq_project/*/*zcat: Decompress and print to screen
We have seen that to view the content of a compressed file and make sense of the content we had to first decompress the file. However, sequence files tend to get rather large and we might not want to decompress our files to not clutter our system.
Luckily, there is one useful tool in bash to decompress the file and print the content to the screen called zcat. When running zcat on a file then the original compressed file is kept as is. We combine the zcat command with the head command, since we do not want to print millions of sequences to the screen but only want to explore the first few rows:
zcat data/seq_project/barcode001_User1_ITS_1_L001/Sample-DUMMY1_R1.fastq.gz | headFor Mac users using the zsh shell, zcat might not work as expected. Try using gzcat instead:
gzcat data/seq_project/barcode001_User1_ITS_1_L001/Sample-DUMMY1_R1.fastq.gz | headgrep: Find patterns in data
The grep command is used to search for words, or patterns, in any text file. This command is simple but very useful for sanity checks after file transformations.
Let’s first search for some things in the text files we generated, for example, we might want to only print information for the R1 files:
#grep a pattern, here R1, in fastq_paths.txt
grep "R1" fastq_paths.txt
We see the list of files that match our pattern. If we simply are interested in the number of files that match our pattern, we could add the option -c to count how often the pattern we search for occurs.
grep -c "R1" fastq_paths.txtWe can also use grep with wildcards, for example, if we want to look only at samples from User1 we could do the following:
grep "User1_*" fastq_paths.txt- Grep for paths containing the pattern “ITS_9” in fastq_paths.txt
- Grep for the pattern “AAGACG” in any of the fastq.gz files (advanced)
- Count how often “AAGACG” occurs in any in any of the fastq.gz files (advanced)
Click me to see an answer
#1
grep "ITS_9" fastq_paths.txt

#2
zcat data/seq_project/barcode001_User1_ITS_1_L001/Sample-DUMMY1_R1.fastq.gz | grep "AAGACG"

#3
zcat data/seq_project/barcode001_User1_ITS_1_L001/Sample-DUMMY1_R1.fastq.gz | grep -c "AAGACG"
The last two commands can be very useful to check if sequencing adapters or primers are still part of your sequence.
wc: Count things II
We have seen before that wc is a command that allows us to count the number of lines in a file and we can easily use it on fastq files to get an idea about how many sequences we work with:
zcat data/seq_project/barcode001_User1_ITS_1_L001/Sample-DUMMY1_R2.fastq.gz | wc -lAfter running this we see that we work with 179,384 / 4 sequences. We need to divide the number we see on the screen by 4 since each sequence is represented by 4 lines of information in our fastq file.
We have seen that we need to divide the output of wc by four to get the total number of sequences. We can do this with a calculator but actually, some intermediate bash can also be used to do this for us:
zcat data/seq_project/barcode001_User1_ITS_1_L001/Sample-DUMMY1_R2.fastq.gz | echo $(( $(wc -l) /4))In the command above we have some new syntax:
- The
echocommand is used to display messages or print information to the terminal. In our case it will print whatever is going on in this section$(( $(wc -l) /4)) $(...)indicates a command substitution. It allows the output of the enclosed command (wc -l) to be used as part of another command. Without command substitution (wc -l alone), you would not capture the output; instead, you would only see the literal text “wc -l”.$((...)): This is an arithmetic expansion in Bash. It allows you to perform arithmetic operations inside the brackets and substitute the result into the command line. In this case, it calculates the result of dividing the number of lines in the fastq file by 4./4: This is dividing the result obtained from wc -l by 4. Since each sequence in a FASTQ file is represented by four lines (identifier, sequence, separator, and quality scores), dividing the total number of lines by 4 gives the number of sequences.
For-loops
Imagine we want to count the lines not only from one but all files. Could we do something like the code below?
zcat data/seq_project/*/*.gz | wc -lWhen running this, we see that the command prints a single number, 869 944, but not the counts for each file, so something did not work right.
The problem with this command is that it prints the text from all 8 fastq files and only afterwards performs the counting. We basically concatenated all files and then calculated the sum of all 8 files. However, what we want to do is to repeat the same operation over and over again:
- Decompress a first file
- Count the lines in the first file
- Decompress a second file
- Count the lines in the second file
- …
A for loop is a bash programming language statement which allows code to be repeatedly executed. I.e. it allows us to run a command 2, 3, 5 or 100 times.
Let’s start with a simple example but before that let’s introduce a simple command echo. echo is used to print information, such as Hello to the terminal:
echo "Welcome 1 time!"We can use for-loops to print something to the screen not only one, but two, three, four … times as follows:
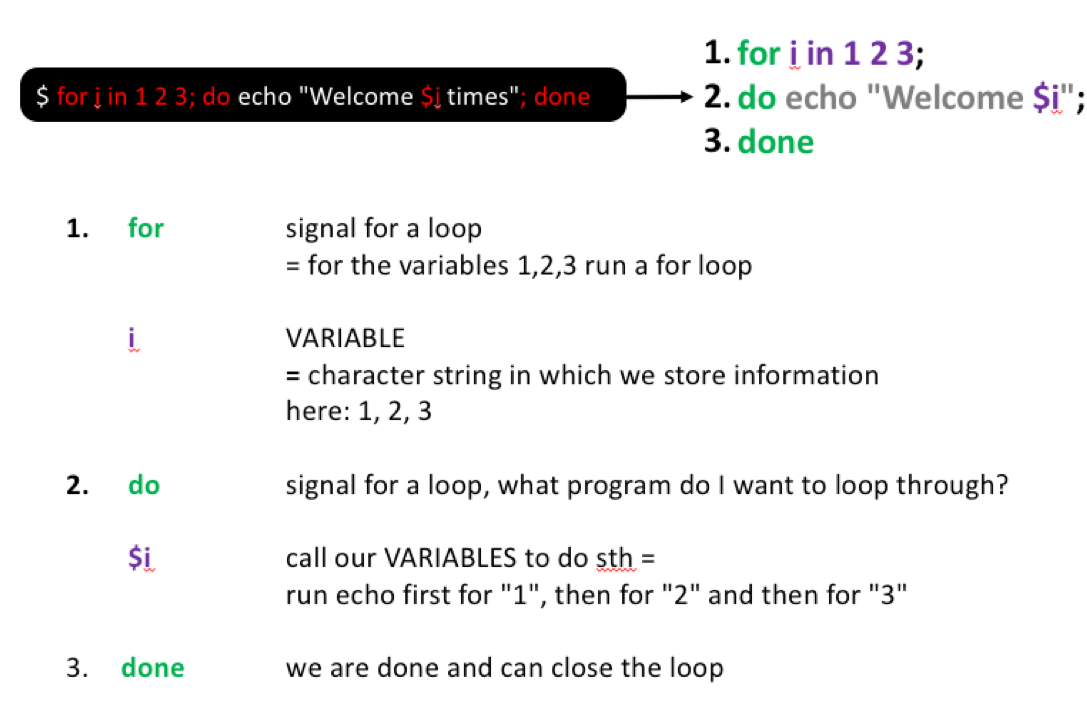
for i in 1 2 3; do
    echo "Welcome $i times"
done
An alternative and more condensed way of writing this that you might encounter in the wild is the following:
for i in 1 2 3; do echo "Welcome $i times"; doneHere, you see what this command does step by step:
Let’s try to do the same but now for our sequencing files by storing the individual files found in data/seq_project/*/*.gz in the variable i and print i to the screen in a for-loop.
for i in data/seq_project/*/*.gz; do
    echo "I work with: File $i"
done
for i in data/seq_project/*/*.gz; do: This part initializes a loop that iterates over all files matching the patterndata/seq_project/*/*.gz. The variable i is assigned to each file in succession.
We can then use these variables stored in i to perform more useful operations, for example for each file, step-by-step, count the number of lines in each file by using some of the tools we have seen before:
for i in data/seq_project/*/*.gz; do
    zcat $i | wc -l
done
zcat $i | wc -l: This is the action performed inside the loop. zcat is used to concatenate and display the content of compressed files (*.gz). The | (pipe) symbol redirects this output to wc -l, which counts the number of lines in the uncompressed content.
- Use a for loop and count how often grep finds the pattern “TAAGA” in each individual fastq.gz file
Click me to see an answer
for i in data/seq_project/*/*.gz; do
    zcat $i | grep -c "TAAGA"
done
Sometimes it is useful to not store the full path in i, especially when we want to store the output of our loop in a new file. Luckily, we can use the list of files we stored in fastq_files.txt to rewrite this command a bit and make use of the fact that we can use cat to print something in a text file to the screen:
for i in `cat fastq_files.txt`; do
    zcat data/seq_project/*/$i | wc -l
done
for i in `cat fastq_files.txt`; do: This initiates a loop that iterates over each item in the file fastq_files.txt. The backticks ` are used to execute thecatcommand within the backticks to read the content of the text file and assign its output to the variable i.zcat data/seq_project/*/$i | wc -l: Like before, this line uncompresses (zcat) and counts (wc) the number of lines in the specified file. However, in this case, the file is determined by the content of fastq_files.txt, which contains a list of file names.
After this modification of the code, we can very easily store the output in a file instead of printing the results to the screen.
#Count the number of lines in each sequencing file
#Store the output in a new folder
mkdir counts

for i in `cat fastq_files.txt`; do
    zcat data/seq_project/*/$i | wc -l > counts/$i.txt
done

ls -l counts/*txt

head counts/Sample-DUMMY1_R1.fastq.gz.txtLet’s get a bit more advanced to show you some powerful features of bash. For this imagine that you would do this for 100 files. In this case it would be useful to see the file names next to the counts. We can achieve this by using what we have learned in the Better counting tip where we have learned about echo and command substitution.
for i in data/seq_project/*/*.gz; do
    echo "$i: $(zcat $i | wc -l)"
done- The echo command is used to display messages or print information to the terminal. In our case it will print whatever is going on here
"$i: $(zcat $i | wc -l)" $(...): These parentheses are used for command substitution. It means that the commandzcat $i | wc -lis executed, and its output (the line count of the uncompressed content) is substituted in that position.- The double quotes (““) perform what is called a string concatenation. It concatenates the filename ($i), a colon (:), a space, and the line count obtained from the command substitution. The entire string is then passed as a single argument to the echo command.
Almost perfect, now we only want to divide this by 4:
for i in data/seq_project/*/*.gz; do
    echo "$i: $(( $(zcat $i | wc -l) /4 ))"
done
Notice, how we use both single brackets and double brackets?
$((...))in contrast to$(...)is an arithmetic expansion in Bash. It allows you to perform arithmetic operations and substitute the result into the command line.
For a lot of mapping files for amplicon analyses, you need to prepare a table that lists your files, often with the R1 and R2 files in separate columns. How could we do this using bash?
This code is more advanced and uses a few concepts we have not talked about but should give you an idea about the different data transformations you can do with bash.
for file in data/seq_project/*/*.gz; do
    if [[ $file == *_R1.fastq.gz ]]; then
        r1_file=$file
        r2_file=$(echo $file | sed 's/_R1/_R2/')
        echo "$r1_file,$r2_file"
    fi
done
for file in data/seq_project/*/*.gz: We loop through all fastq.gz filesif [[ $file == *_R1.fastq.gz ]]; then: This line checks if the current file’s name matches the pattern *_R1.fastq.gz. The[[ ... ]]is a conditional construct in bash, and the == is used for string comparison. If the condition is true (i.e., the file is an R1 file), then the code inside the if block will be executed. The block starts withifand finishes at thefi.r1_file=$file: This line involves creating a variable named r1_file and assigning it the value of the current file($file). A variable is a symbolic name or identifier associated with a value or data. It allows you to store and retrieve information for later use. Here, r1_file is used to store the name of the current R1 file.r2_file=$(echo $file | sed 's/_R1/_R2/'): This line sets the variable r2_file by replacing _R1 with _R2 in the current file name. This is done using the sed command, which is a stream editor for filtering and transforming text.echo "$r1_file,$r2_file": This line prints the R1 and R2 file names separated by a comma. This will be part of the output in the format R1,R2.
We can do even more and add a column with the sample name with what we have learned before:
for file in data/seq_project/*/*.gz; do
    if [[ $file == *_R1.fastq.gz ]]; then
        sample_name=$(echo $file | cut -f3 -d "/" )
        r1_file=$file
        r2_file=$(echo $file | sed 's/_R1/_R2/')
        echo "$sample_name,$r1_file,$r2_file"
    fi
done
You can easily combine this with some of the things we learned, such as using cut to extract specific parts of the sample_name as well. I.e. lets assume you only want to list the index:
for file in data/seq_project/*/*.gz; do
    if [[ $file == *_R1.fastq.gz ]]; then
        sample_name=$(echo $file | cut -f3 -d "/"  |cut -f1 -d "_" )
        r1_file=$file
        r2_file=$(echo $file | sed 's/_R1/_R2/')
        echo "$sample_name,$r1_file,$r2_file"
    fi
done