ssh username@serverUsing an HPC
Now that you are more familiar with the command line, we will learn how to work on the UvA Crunchomics HPC. On this page, you will:
- Connect to Crunchomics and prepare your account
- Transfer the sequencing data from your own computer to Crunchomics
- Run your first analyses on the compute nodes with SLURM:
srunfor short, interactive analysessbatchfor longer running, more resource intensive analyses
- Install your own software with conda
- Keep documenting what you do in the notebook (
notes.md) that you started on day 1
For people following this tutorial outside of UvA:
- If you have access to an HPC that uses SLURM, you can still follow the tutorial
- If you do not have access to an HPC but are interested in how to install and run software that can be used to analyse sequencing data, you still might want to check out the steps below. The dataset is very small and all analyses can be run on a desktop computer
Connecting to the HPC
ssh: Connecting to a server
SSH (Secure Shell) is a way for two computers to connect to each other securely. Here, we use it to connect our computer with the Crunchomics HPC. The general command looks like this:
Here:
usernameis your account name on the HPC. For Crunchomics, this is your UvAnetIDserveris the address of the HPC you want to connect to. For Crunchomics, this isomics-h0.science.uva.nl
To log in to Crunchomics, use the following command and enter your UvA password when you are asked for it. Remember that nothing appears on the screen while you type your password:
# Log in to Crunchomics (replace uvanetid with your own UvAnetID)
ssh uvanetid@omics-h0.science.uva.nl
You did the same during the Before you start checks. After logging in, the prompt changes: it now shows your UvAnetID and omics-h0. Every command you type now runs on Crunchomics, not on your own computer.
ImportantImportant tips for connecting
- If you want to log in to Crunchomics while working from UvA, use the eduroam network, not the open Amsterdam Science Park network
- If you are connecting from outside UvA, you must be connected to the VPN. Contact ICT if you have not set it up or encounter issues
- Always double-check your username and the server address to avoid login errors
TipTip: Viewing graphical output with ssh -X (optional)
Some programs on the HPC can open a window, for example to show a plot or a PDF. To see such windows on your own computer, log in with the -X option:
ssh -X uvanetid@omics-h0.science.uva.nl-X enables what is called X11 forwarding: the HPC sends the graphical output to your computer. In this tutorial we don’t need this, because we copy the results to our own computer instead.
Crunchomics: Preparing your account
If this is your first time using Crunchomics, you need to run a small bash script to set up your account. Ignore this section if you have done this before. The script does the following:
- Adds
/zfs/omics/software/binto your PATH. The PATH is the list of folders in which bash looks for programs. With this change, bash can find the software that is already installed on Crunchomics - Sets up a Python 3 environment with some useful Python packages
- Creates a link called
personalin your home directory. This link leads to your personal directory, which has 500 GB of space. Your home directory itself only has 25 GB
To set up your account, run the following commands:
# First, orient yourself
pwd
ls -lh

# Run the Crunchomics installation script
/zfs/omics/software/script/omics_install_script

# Check what changed
# You should now see the personal folder inside your home directory
ls -lh
On a new account ls -lh is probably empty and after the script, ls -lh prints a line like this (your date and group name can differ):
lrwxrwxrwx. 1 username sils-omics-unix-fnwi 27 Sep 4 2023 personal -> /zfs/omics/personal/usernameHere:
- The arrow (
->) tells you thatpersonalis not a normal folder. We come back to what this exactly means in the next section. - The
lin the access mode means link
Preparing your working directory
Next, let’s make a project folder for our analyses. Always make project folders inside your personal directory, since it has much more space than your home directory. We give the folder the same name as on our own computer, data_analysis:
# Go into the personal folder
cd personal

# Make a new project folder and go into it
mkdir data_analysis
cd data_analysis

# Check that you are in the right folder
pwd
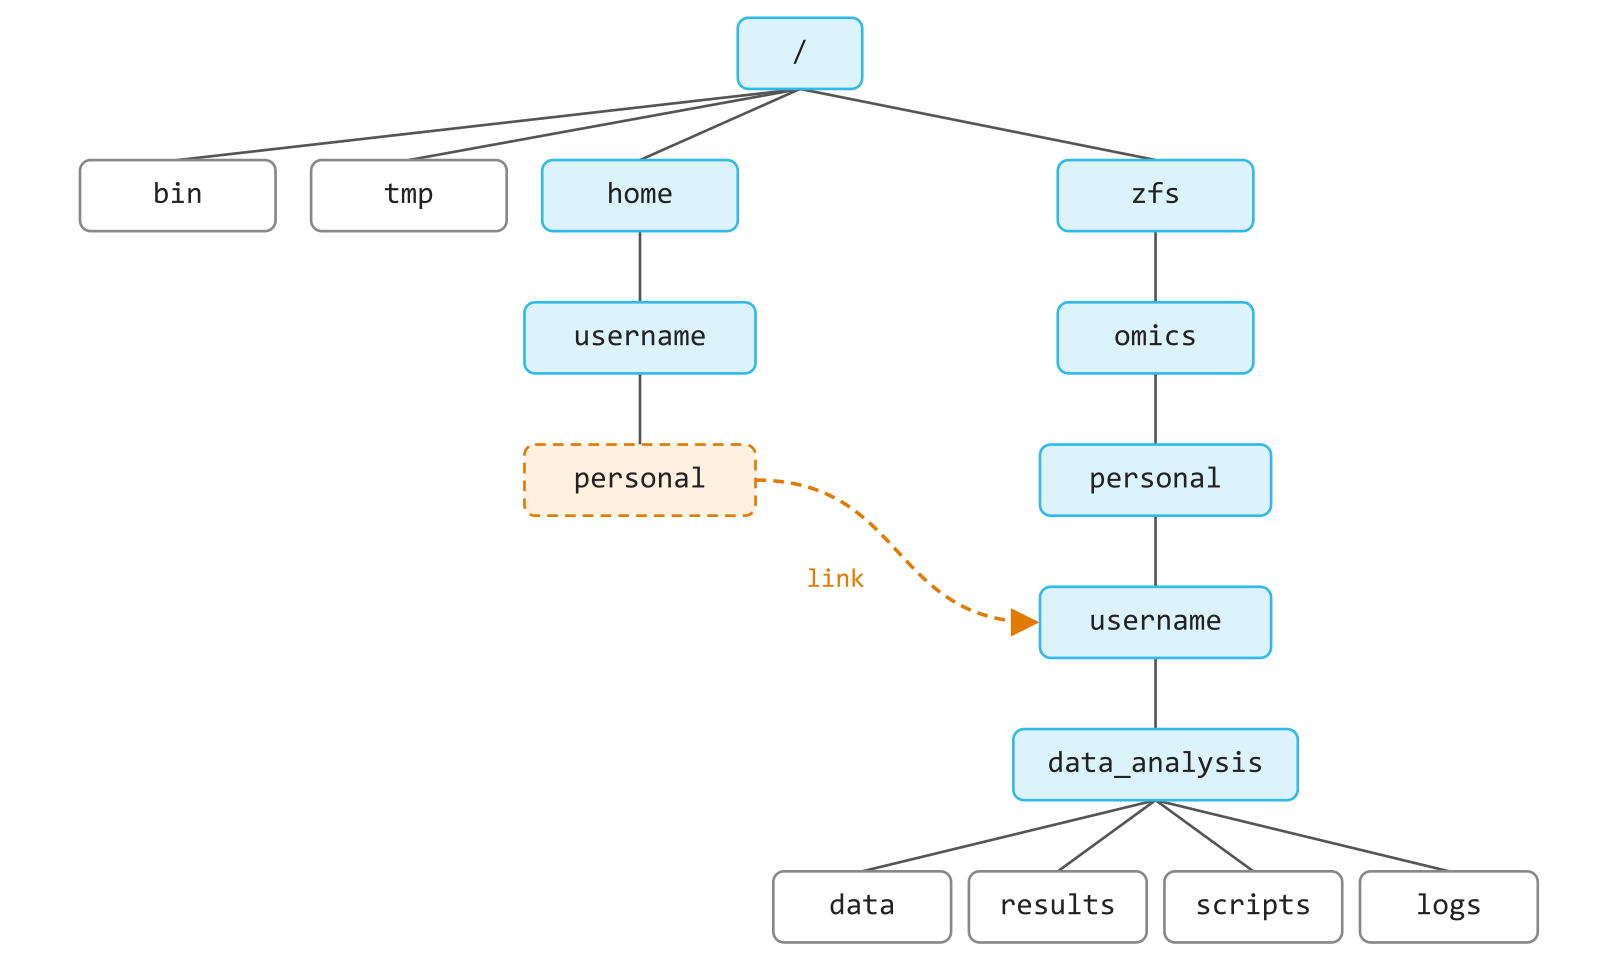
pwd prints /home/username/personal/data_analysis, so it looks like you are in your home directory. But your files are not actually stored there. The reason is that personal is a link (also called a symbolic link or symlink): a shortcut that points to another folder, here /zfs/omics/personal/username. That is what the arrow in the ls -lh output above showed. For us this means that ~/personal/data_analysis and /zfs/omics/personal/username/data_analysis are two paths to the same folder:
You now have a clean workspace for all the analyses that you will run on Crunchomics. As on your own computer, it is good practice to keep your raw data, results and scripts in separate folders.
scp: Transferring data to and from a server
Next, we want to transfer the data folder with our sequencing data from our own computer to the new project folder on Crunchomics. We do this with scp (Secure Copy Protocol), which securely copies files and folders between your computer and a remote server.
The basic syntax is:
scp [options] SOURCE DESTINATION- A location on a server is written as
username@server:path_on_the_server
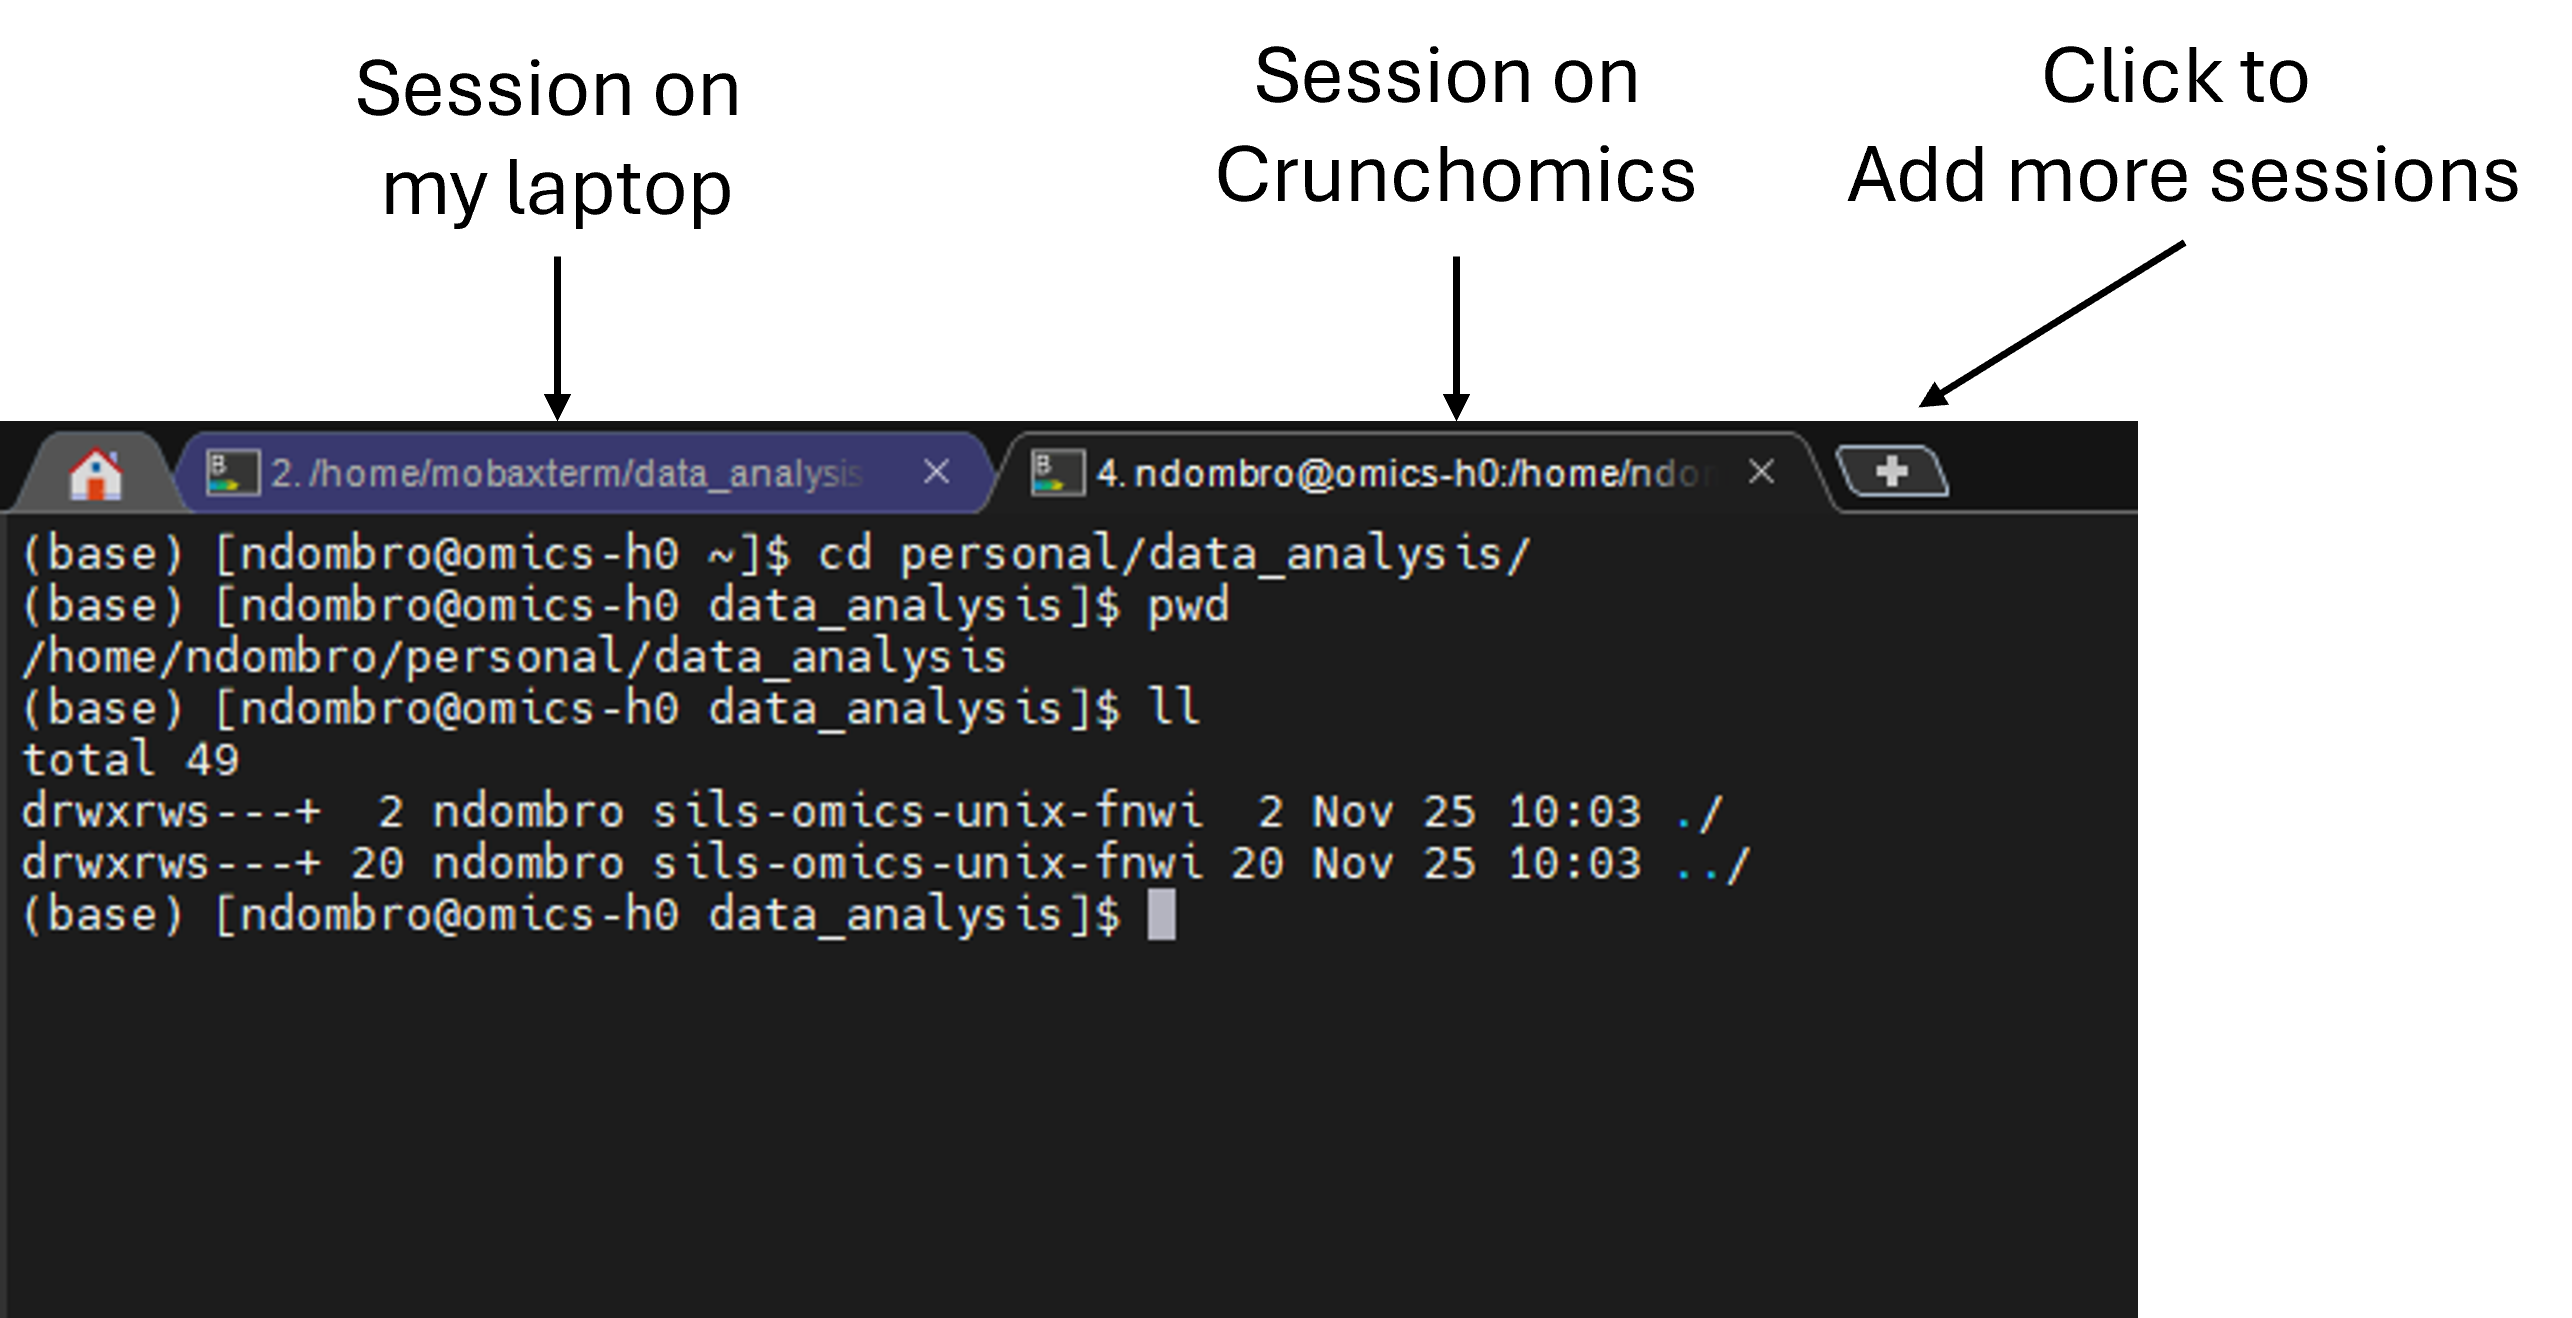
When transferring data, you must run scp in a terminal on your own computer, not in a terminal that is logged in to the HPC. To keep yourself organized, it is useful to have two terminals open: one on your own computer and one on Crunchomics. In MobaXterm, you can open a second terminal in a new tab:
On other systems:
- WSL2 (Windows): click the + at the top of the Ubuntu window to open a new tab. If the new tab opens PowerShell instead of Ubuntu, click the small arrow next to the + and choose Ubuntu
- Mac: in Terminal, press Command-N, or choose Shell, then New Window, then New Window with Profile
To copy the entire data folder into your Crunchomics project folder, use:
# Run this in the terminal on your OWN computer (not on the HPC),
# go to your local data_analysis folder (where the data folder is)
cd ~/data_analysis

# Check that the data folder is present
ls -l

# Replace both instances of 'username' with your UvAnetID
scp -r data username@omics-h0.science.uva.nl:/home/username/personal/data_analysis
Here:
-rcopies a folder together with everything inside it (recursive). Without-r,scponly copies single filesdatais the source: the folder on your own computerusername@omics-h0.science.uva.nl:/home/username/personal/data_analysisis the destination: your project folder on Crunchomics- Same as when you use
sshyou will get asked for your Uva password and also here you won’t see anything when you type
Now switch to the terminal that is logged in to Crunchomics and check that the files arrived:
# Run this on Crunchomics, inside the data_analysis folder
ls -l data/seq_project/*/*fastq.gz

# We expect 8 files (4 samples, R1 and R2 each)
ls data/seq_project/*/*fastq.gz | wc -l
TipTip: Moving data from the HPC to your own computer (optional)
You can also copy results from the HPC to your own computer. For this, you switch source and destination. For example, to copy a single sequencing file from Crunchomics:
- We do not need
-r, since we only copy a single file - We again run this command in a terminal on our own computer, not on the HPC
- The
.at the end means “copy into the folder I am in right now” on your own computer. If you want to copy the file elsewhere, replace.with a path
scp username@omics-h0.science.uva.nl:/home/username/personal/data_analysis/data/seq_project/barcode001_User1_ITS_1_L001/Sample-DUMMY1_R1.fastq.gz .
TipTip: Moving files with wildcards (optional)
We can also copy several files at once with a wildcard. Then scp copies only the files, not the folders they are in.
# On Crunchomics: make a folder to copy the data into
mkdir transfer_test

# On your own computer: copy all fastq.gz files to the new folder on Crunchomics
scp data/seq_project/barcode00*/*fastq.gz username@omics-h0.science.uva.nl:/home/username/personal/data_analysis/transfer_test

# On Crunchomics: view the data
# See how the folder structure is different compared to our first example?
ls -l transfer_test/*

# On Crunchomics:
# After you checked that everything worked, remove the folder since it is no longer needed
rm -r transfer_test
Copying from Crunchomics with a wildcard: if the wildcard is in the path on Crunchomics, for example when you copy results back to your own computer, put the server part in quotes:
# On your own computer: copy all fastq.gz files of one sample from Crunchomics into the current folder
scp 'username@omics-h0.science.uva.nl:/home/username/personal/data_analysis/data/seq_project/barcode001_User1_ITS_1_L001/*fastq.gz' .
The quotes stop the shell on your own computer from looking for these files, so the wildcard is passed on to Crunchomics. Without quotes, this often works in bash, but zsh (the default shell on a Mac) stops with no matches found. With quotes, it works in both.
NotebookNotebook checkpoint: Setting up on Crunchomics
Today you keep writing in the same notes.md on your own computer. You copy the commands from the terminal that is logged in to Crunchomics into it.
Since you now work on two computers, your notebook needs to say where each command ran. Start code blocks where you switch terminals with a comment: # On my computer or # On Crunchomics.
Add a new heading ## Setting up on Crunchomics, and below it:
- The command you used to log in
- The account setup with
omics_install_script, with a note that this is only needed once. You can also add a#in front of that line of code to not accidentally run it again. - The commands that made your project folder, and in normal text, where this folder is
- The
scpcommand that copied the data, and the check that all files arrived
Notebook-answerCompare with my notes
## Setting up on Crunchomics

```bash
# On my computer: log in to Crunchomics (on eduroam or with the VPN)
ssh uvanetid@omics-h0.science.uva.nl

# On Crunchomics: set up my account (only needed once)
# Adds the Crunchomics software to my PATH and makes the ~/personal link (500 GB)
#/zfs/omics/software/script/omics_install_script

# On Crunchomics: make the project folder inside my personal folder
cd ~/personal
mkdir data_analysis
```

My project folder on Crunchomics is `~/personal/data_analysis`, with the same name as on my computer.

```bash
# On my computer, inside my local data_analysis folder: copy the data to Crunchomics
scp -r data uvanetid@omics-h0.science.uva.nl:/home/uvanetid/personal/data_analysis

# On Crunchomics, inside data_analysis: check that all 8 fastq.gz files arrived
ls data/seq_project/*/*fastq.gz | wc -l
```
Submitting jobs with SLURM
Login node and compute nodes
In the HPC introduction, you learned that an HPC has two main parts:
- The login node: where you log in and do light work, such as moving files, editing scripts or preparing jobs
- The compute nodes: where the actual analyses run. These nodes have more CPUs and memory
We do not run big analyses on the login node. Instead, we send them to the compute nodes as jobs. A job is a task that you ask the HPC to run, together with the resources it needs. The jobs are managed by SLURM, a workload manager that decides when, where and how your jobs run based on the available resources.
squeue: View the jobs in the queue
The command below shows you which jobs are currently running or waiting in the queue:
squeueThis shows all jobs on the system and might look something like this:
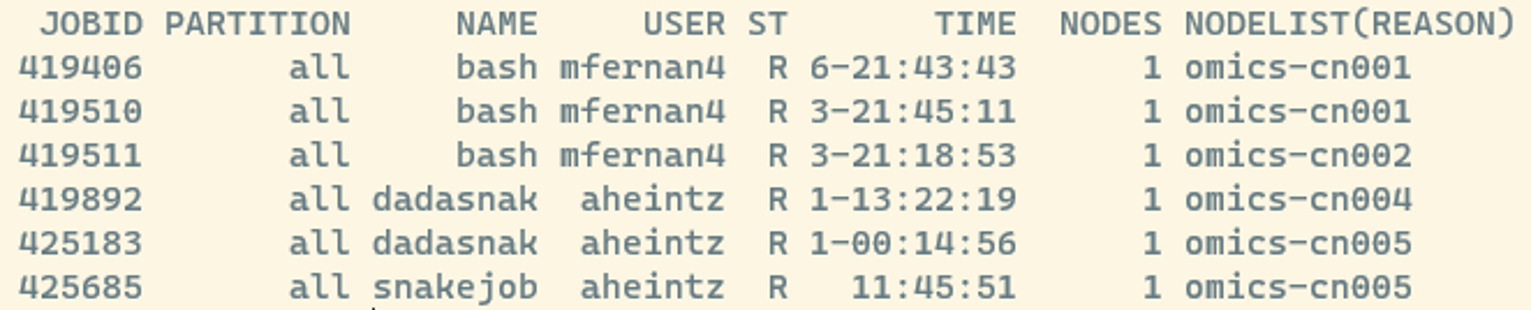
Some useful columns to know:
- JOBID: a unique number for each job. You can use it to check on or cancel a job later
- ST: the current state of the job, e.g. R = running, PD = pending (waiting). A full list of SLURM job state codes can be found on this webpage
Once you have submitted a job, it appears in this list as well. To see only your own jobs, add the -u option followed by your user name. Instead of typing your user name, you can use $USER. This variable is an environment variable, a variable that is already set for you when you log in. Before running the command, bash replaces $USER with your user name:
# Check what is stored in the USER variable
echo $USER

# Check if you have any running jobs
squeue -u $USER
ImportantImportant: Don’t overwrite environment variables
Environment variables are written in capitals. Besides USER, there are, for example, HOME (the path to your home directory) and PATH, which you met when you set up your account: the list of folders in which bash looks for programs. You can look at them with echo, just like $USER.
Do NOT use these names for your own variables. If you do, you replace the value that bash needs. For example, if you write PATH=data/seq_project, bash no longer knows where to find its programs, and even ls stops working with a command not found error.
If this happens, close the terminal, or log out and log in again. As with your own variables, the change only lasts in the terminal window where you made it.
srun: Submitting a job interactively
Now let’s run our first job on a compute node. There are two main ways to submit jobs: srun and sbatch. We start with srun, which you typically use when:
- You want to run tasks interactively, which means that you see the output directly on your screen
- You are testing or debugging your commands before writing a job script
- You have short jobs (usually less than an hour)
Let’s start with a very simple example to see how srun works:
srun --ntasks=1 --cpus-per-task=1 --mem=1G --time=00:10:00 echo "Hello world"Here’s what each part means:
srun: tells SLURM that you want to run something on a compute node, with the resources that follow--ntasks=1: run the command once. A task is one copy of your command. Without this option, SLURM can start more than one copy, and you would see “Hello world” twice--cpus-per-task=1: request 1 CPU for that task--mem=1G: request 1 GB of memory--time=00:10:00: set a maximum run time of 10 minutes (hours:minutes:seconds). If the job takes longer, SLURM stops itecho "Hello world": the actual command to run
So everything between srun and the actual command tells SLURM which resources your job needs on the compute node. The job runs so fast that you won’t see it in squeue. But congratulations, after submitting this, you just communicated with a compute node for the first time.
If the compute nodes are busy, for example when everybody in the workshop submits a job at the same time, your job has to wait in the queue until enough CPUs and memory are free. srun then first prints a message like this (with a different job number):
srun: job 387583 queued and waiting for resourcesAs soon as a compute node is free, it continues with:
srun: job 387583 has been allocated resourcesWhile your job waits, the prompt does not come back. That is normal. Don’t press Ctrl+C, because that cancels your job and you have to queue again. How long you wait depends on how busy Crunchomics is and on how many resources you ask for. Small and short jobs often start sooner.
Important
Jobs started with srun stop if you lose the connection to the HPC, for example when you close your laptop. For longer jobs, use sbatch (see below).
Run seqkit stats with srun
Next, let’s use srun for something more useful. SeqKit is a toolkit for working with sequence files, and it is already installed on Crunchomics (version 2.7.0). Its command seqkit stats gives a summary of each fastq file: how many reads it has, how long they are, and how good their quality is. We use it to get a first overview of the sequencing data that we just copied to Crunchomics.
Whenever you use a tool for the first time, check its help page (e.g. seqkit stats -h) to see all available options, or look online for a manual.
# Make a results folder with a seqkit folder inside
mkdir -p results/seqkit

# Run seqkit stats on all fastq.gz files with srun
srun --ntasks=1 --cpus-per-task=1 --mem=5G --time=00:30:00 seqkit stats -b -a -T -o results/seqkit/stats_raw.txt data/seq_project/*/*gz --threads 1

# Check the output: we expect one table with a header line and one line per fastq.gz file
# We see 9 (1 header + 8 files)
wc -l results/seqkit/stats_raw.txt
Here:
seqkit stats data/seq_project/*/*gz: runseqkit statson all files in theseq_projectfolders that end withgz-b: only output the file name, without the folders in front of it-a: print all statistics. Without it, seqkit prints only the basic ones, such as the number and length of the reads, but not their quality-T: print the output as a table in which the columns are separated by tabs. This format is easy to read for other commands, such ascut-o results/seqkit/stats_raw.txt: write the output into this file.--threads 1: let seqkit use 1 CPU (in our case, thread and CPU mean the same)- Important: always make sure that the number of CPUs you request from SLURM matches the number of CPUs (threads) the software uses. If the tool uses more than you requested, it competes with itself for CPUs. If you request more than the tool uses, the extra CPUs sit idle while others could use them
Since we work with little data, this runs fast despite only using 1 CPU. It may even finish within a few seconds. If you are logged in to Crunchomics in a second terminal and run squeue while your job is running, you should see it (in the example below, the job is named after the software and got the job ID 379646):

It is a good habit to look at the outputs of whatever software you run, not only to understand your data but also to make sure that the software ran correctly:
cat results/seqkit/stats_raw.txtThe output should look like this:

The most useful columns for us are:
num_seqs: the number of reads in the filemin_len,avg_lenandmax_len: the shortest, average and longest read lengthQ20(%)andQ30(%): the percentage of bases with a quality score of at least 20 or 30. A quality score of 20 means that there is a 1 in 100 chance that the base is wrong, a score of 30 a 1 in 1000 chanceGC(%): the percentage of G and C bases
TipTip: FastQC for visual quality reports (optional)
seqkit stats gives us summary numbers, which might not be enough to accurately assess our data. Another very common tool for a more detailed, visual check of sequencing quality is FastQC, which is also installed on Crunchomics. It makes one HTML report per fastq file, with plots of the quality along the reads. You open these reports in the internet browser of your own computer, so you first copy them with scp. MultiQC can combine many of these reports into one. MultiQC is not installed on Crunchomics, but below we will also learn how to install software ourselves.
QuestionExercise
- On day 1, we counted the lines in each fastq file (
results/counts/line_counts_bash.txton your own computer). Use this to work out how many readsSample-DUMMY1_R2.fastq.gzhas. Does this matchnum_seqsin the seqkit table? - Use
grepto print only the rows for the R1 and the R2 file ofSample-DUMMY1. Compare theirnum_seqs. What do you notice? - Use
cutto print only the columnsfileandnum_seqsof the table. Is what you noticed in question 2 true for all samples?
AnswerClick me to see an answer
# Question 1:
# On your own computer: find the file name, plus the line after it (-A 1), which holds the count
grep -A 1 "Sample-DUMMY1_R2.fastq.gz" results/counts/line_counts_bash.txt

# Let bash divide the number of lines by 4
# Here, we use the command substitution for our previous command and combine it with tail -n 1
# to only extract the counts themselves
echo $(( $(grep -A 1 "Sample-DUMMY1_R2.fastq.gz" results/counts/line_counts_bash.txt | tail -n 1) / 4 ))

# On Crunchomics: print only the row for this file from the seqkit table
grep "Sample-DUMMY1_R2" results/seqkit/stats_raw.txt

# Question 2:
# On Crunchomics: show the R1 and R2 rows of one sample together
grep "Sample-DUMMY1" results/seqkit/stats_raw.txt

# Question 3:
# file is the 1st column and num_seqs is the 4th column
# cut uses tabs to split columns by default, so we don't need -d here
cut -f1,4 results/seqkit/stats_raw.txt
In line_counts_bash.txt, each file name and its count are on two separate lines. A plain grep only prints the line with the file name. The option -A 1 (after) also prints the line after each match, which holds the count. With 8 files, you can also just read the whole file with cat. With 100 files, grep finds the right line much faster.
For question 1: each read takes up 4 lines in a fastq file, so the number of reads is the number of lines divided by 4. Sample-DUMMY1_R2.fastq.gz has 179,384 lines, which is 44,846 reads. seqkit reports the same number. When two different methods give the same answer, we can trust the result a lot more.
For question 2: the R1 and R2 file of the same sample always have the same number of reads. Each read in R1 has its partner read in R2. This is what you expect for paired-end sequencing data and is a good sanity check that no reads went missing in R1 or R2.
For question 3: with only two columns left, you can check all 8 files at a glance. For every sample, the R1 and the R2 file have the same number of reads, so we can safely continue with the next steps of our analysis.
TipTip: Working interactively on a compute node (optional)
Sometimes you want to try out several commands after each other on a compute node, for example to test a new tool. Instead of putting srun in front of every command, you can open an interactive session: a shell that runs on a compute node.
# Open an interactive bash shell on a compute node for at most 1 hour
srun --ntasks=1 --cpus-per-task=1 --mem=5G --time=01:00:00 --pty bash -i
Here:
--pty bash -istarts an interactive bash shell on the compute node, instead of running a single command
Once you ran this, you will see that your prompt changed: it now shows the name of the compute node instead of omics-h0. You can check where you are with the command hostname, which prints the name of the computer you are working on. Every command you type now runs on the compute node, with the resources you requested.
When you are done, leave the compute node and go back to the login node:
exit
Important
Always exit an interactive session when you are done. As long as the session is open, the CPUs and memory you requested stay reserved for you, even if you don’t use them, and other people have to wait for them.
TipTip: Keeping srun jobs running with screen (optional)
srun has two downsides for jobs that run for a long time: you can’t use your terminal while the job runs, and the job stops if you lose the connection to the HPC, for example when you close your laptop. There are two ways around this:
- Use
sbatch(see below) - Run the
sruncommand insidescreen
We will first discuss option 2. screen opens a terminal that keeps running on Crunchomics, even when you are not connected. Such a terminal is called a screen session. You can leave a session and come back to it later, and everything that runs inside it continues in the meantime, as long as Crunchomics itself is running.
To start a screen session:
screenWe detach from a screen (go outside of it but keep it running in the background) by pressing Ctrl+a and then d.
If you want to run several analyses in several screens at the same time, it is useful to give your screens descriptive names with the -S option:
screen -S run_seqkitAfter detaching from this screen again with Ctrl+a and then d, you can list all running screens with:
screen -lsWe see the run_seqkit and the screen that we didn’t give a name, which should be named something like 3399729.pts-22.omics-h0.
You can reconnect to an existing screen like this:
screen -r run_seqkitInside the screen, we can run seqkit stats the same way as before, but now we don’t risk losing a long-running job:
srun --ntasks=1 --cpus-per-task=1 --mem=5G --time=00:30:00 seqkit stats -b -a -T -o results/seqkit/stats_raw.txt data/seq_project/*/*gz --threads 1If you want to completely close and remove a screen, type the following and press enter while you are inside the screen:
exitMake sure that you close both screens we generated in this session. For the screen that we did not give a name first run screen -r pts-22.omics-h0 (replace the exact name, with the name you see with screen -ls) and then type exit.
sbatch: Submitting a long-running job
While srun is great for quick, interactive runs, most analyses on an HPC are submitted with sbatch. With sbatch, you write your commands into a job script, a text file with all the commands and the resources your job needs. SLURM then runs the script in the background, even after you log out.
Use sbatch when:
- You have long or resource-intensive analyses
- You want jobs to run unattended, without your direct supervision
- You want to run several jobs after each other or at the same time
Step 1: Create folders for scripts and logs
We keep our project tidy by making separate folders for our job scripts and for the log files that SLURM writes:
mkdir -p scripts logs

# Check that the folders are there
ls -l
Step 2: Write a job script
We run seqkit stats again, but this time with sbatch instead of srun, so that you can directly compare the two.
Use nano to create a script file:
nano scripts/seqkit.shThen add the following content inside that file:
#!/bin/bash
#SBATCH --job-name=seqkit
#SBATCH --output=logs/seqkit_%j.out
#SBATCH --error=logs/seqkit_%j.err
#SBATCH --ntasks=1
#SBATCH --cpus-per-task=1
#SBATCH --mem=5G
#SBATCH --time=01:00:00

# This script generates a tsv with sequence read statistics
# Run it from inside the data_analysis folder with `sbatch scripts/seqkit.sh`

echo "seqkit job started on:"
date

# Run seqkit stats on the raw sequence data
seqkit stats -b -a -T -o results/seqkit/stats_raw.txt data/seq_project/*/*gz --threads 1

echo "seqkit job finished on:"
date
Save and exit:
- Press
Ctrl+Xto exit, thenYto confirm that you want to save the file, then Enter to keep the file name
Notice how the seqkit stats command looks exactly the same as when we used srun? The main difference between srun and sbatch is how we package the instructions for the compute node.
Step 3: Understanding your job script
In the job script above:
#!/bin/bash: As in the day 1 script the shebang line tells the system to run the script with bash. Add it at the very top of every job script#SBATCH --...: these lines tell SLURM which resources the job needs and how to name things. They are the same options that you used withsrun, plus three new ones:--job-name: a name for your job, which you see insqueue--output: the file in which SLURM stores everything the job prints to the screen (the standard output)--error: the file in which SLURM stores error messages (the standard error)%jin the file names is replaced by the job ID. This way, every job gets its own log files and nothing is overwritten
echoanddate: print messages with the time, so that you can follow the progress of the job in the log fileseqkit stats ...: the actual analysis that runs on the compute node
Notice that the #SBATCH lines start with #? For bash, these lines are comments. Only SLURM reads them.
Important: Generate the logs folder in which we safe the output and error files before you run any sbatch script as SLURM doesn’t create these folder itself.
Step 4: Submit and monitor your job
# Submit the job script to SLURM
sbatch scripts/seqkit.sh

# Check the job status (the job may run too fast to appear)
squeue -u $USER

# Once the job is finished and no longer in the list, check the outputs
ls -l logs
ls -l results/seqkitImportant: The job runs from the folder in which you typed sbatch, so relative paths start from there. In our case, this means that it runs from inside the data_analysis folder and from this location can find data/seq_project/*/*gz. Do NOT run sbatch from inside the scripts folder, as this would break the path to e.g. the data folder.
If you do run sbatch from inside scripts, SLURM makes a new logs folder inside scripts, and the error log shows that seqkit can’t find the data:
[ERRO] stat data/seq_project/*/*gz: no such file or directoryThis is also the error from day 1 (No such file or directory), only in other words.
When the job is submitted, you see something like Submitted batch job 379723, and two new log files appear in your logs folder:
seqkit_<jobID>.out: the standard output, e.g. the messages fromechoanddateseqkit_<jobID>.err: the error log. Check this file if your job fails
Have a look at both log files, for example with cat logs/seqkit_*.out. Do you see the messages from echo and date? Some programs also write normal progress messages into the error log, so a .err file with content does not always mean that something went wrong. Seqkit is one of them: its .err file shows how many files it processed (you should see processed files: 8 / 8 [] ETA: 0s. done).
Since we gave seqkit the same output file name, the table from the srun run was replaced by the new one. Look at the time in ls -l results/seqkit to see this. Here that is fine, because the input is the same. With real data, overwriting results by accident can cost you hours of work, so choose your output names with care.
TipTip: Debugging your first sbatch jobs
If your job fails:
- Check the
.errand.outfiles in thelogsfolder. These files usually tell you what went wrong - Check that your input files and paths exist, e.g. with
ls. The job runs from the folder in which you typedsbatch, so relative paths start from there - Try to run the main command interactively with
srunfirst. If it works there, it should also work in a script
Step 5: scancel: Cancelling a job
Sometimes you realize that a job is stuck, misconfigured or uses the wrong resources. You can cancel it with scancel and the job ID:
scancel <jobID>For example, if your job ID was 379723:
scancel 379723You don’t need to worry to about cancelling someone else’s job by accident. scancel only works on your own jobs.
TipTip: Good HPC etiquette
Always cancel jobs that run incorrectly or that you no longer need. This frees resources for others and avoids unnecessary load on Crunchomics.
NotebookNotebook checkpoint: Read statistics with seqkit
Add a new heading ## Read statistics with seqkit to notes.md, and below it:
- Which tool you used, and which version. Run
seqkit versionto find out, and write the version in the comment above the command - The
sbatchcommand, with a comment that names the script and the file it makes. Below the code block, write down the job ID thatsbatchprinted (Submitted batch job ...). The job ID is also part of the names of the log files, so with it you can find the logs of this run later - We ran seqkit twice, first with
srunand then withsbatch, and the second run replaced the table of the first one. Write down which run made the table that is there now - Below the code block: does the number of reads of
Sample-DUMMY1_R2match your count from day 1?
You don’t need to copy the content of the job script into your notebook. It is saved in scripts/seqkit.sh, and at the end of the day, we copy it to your own computer.
Choosing the right amount of resources
When you are just starting, choosing the right amount of CPUs, memory and run time can be tricky. The resources a job needs vary a lot between tools and datasets. Here are a few rules of thumb:
- Start small: a lot of tools don’t need huge resources, especially for small test runs
- Check the tool’s documentation: some tools recommend resource settings
- Test with a small dataset first: a subset of your data runs faster and helps you find and fix problems
- Be careful with how memory is counted:
--mem=4Gasks for 4 GB in total for your job, no matter how many CPUs you request.--mem-per-cpu=4Ginstead asks for 4 GB for each CPU, so--cpus-per-task=4 --mem-per-cpu=4Ggives you a total of 16 GB of memory (4 CPUs * 4 GB)
Remember: requesting more resources than you need makes your jobs wait longer in the queue and can block others from running.
If you want to know how much a finished job actually used, have a look at the optional sacct box below.
TipTip: Checking the resources a job used with sacct (optional)
After a job has finished, you can check which resources it actually used with sacct. Replace 379723 with the job ID of your seqkit job:
sacct -j 379723 --format=User,JobID,JobName,State,Start,End,Elapsed,MaxRSS,NCPUSHere:
-j 379723: show the information for job 379723--format=...: choose which columns to show. The most useful ones are:State: whether the job finished successfully (COMPLETED) or not (e.g. FAILED, CANCELLED, TIMEOUT)Elapsed: how long the job ranMaxRSS: the maximum amount of memory the job used. Compare this with the memory you requested with--memNCPUS: the number of CPUs the job had
For my seqkit job, this prints:
     User JobID           JobName      State               Start                 End    Elapsed     MaxRSS      NCPUS
--------- ------------ ---------- ---------- ------------------- ------------------- ---------- ---------- ----------
  ndombro 379723           seqkit  COMPLETED 2026-10-07T09:16:07 2026-10-07T09:16:10   00:00:03                     2
          379723.batch      batch  COMPLETED 2026-10-07T09:16:07 2026-10-07T09:16:10   00:00:03      8384K          2
          379723.exte+     extern  COMPLETED 2026-10-07T09:16:07 2026-10-07T09:16:10   00:00:03                     2
You see three lines for one job. SLURM splits a job into parts, called job steps. The first line is the job as a whole. The .batch line is your job script, and this is the line that shows the memory your commands used. You can ignore the .extern line (the + means that the name was cut off because it is too long for the column).
The job ran for 3 seconds and used at most 8384K, which is about 8 MB of memory (K stands for kilobytes). We asked for 5 GB, so for this small dataset we could have asked for much less.
NCPUS shows 2, although we asked for 1. This is how Crunchomics counts CPUs, and you don’t need to change anything because of it.
How to use this information:
- Compare what your job used with what you requested: if you plan to run similar jobs over and over again, adjust your requests
- Adjust step by step: if your job fails or runs out of memory or time, increase the resources gradually
conda: Installing your own software
Crunchomics already has a lot of software installed, but it doesn’t have every tool, and it doesn’t always have the version you need. Let’s look at fastp, the tool we use in the next section:
# Which fastp does bash find, and which version is it?
which fastp
fastp --version
We see that fastp is installed on Crunchomics and that it comes with version 1.0.1. If we search online, we can find that the newest version is 1.4.0 (at least when I checked in October 2026). Newer versions fix errors and add features, and the version you use can change your results. That is why you should always write down which version of a tool you used, and why you sometimes want to install a specific version yourself.
You can’t install software into the shared software folders of Crunchomics, because you don’t have administrator rights, which give permission to change the software for everyone. However, we can use conda: a program that installs software into your own folders, without administrator rights. mamba does the same as conda, but faster. It understands the same commands, so you can swap conda and mamba in almost all commands that you find online.
conda installs each tool into its own environment: a separate folder with the tool and all the other programs it needs, in exactly the right versions. This way, tools that need different versions of the same program don’t get in each other’s way. To use a tool, you activate its environment. Activating adds the environment’s folder to the front of your PATH (remember, the list of folders in which bash looks for programs), so bash finds the tool there first.
Install Miniforge
First, check if you already have conda or mamba:
conda --version
mamba --version
If both commands print a version number, then conda is already installed, and you can skip to the next section. If they print nothing or an error message (for example one that contains conda: command not found), install Miniforge, a small installer that contains conda and mamba.
ImportantImportant: Install Miniforge into your personal folder, not into your home folder
Your home folder on Crunchomics has only 25 GB of space, and conda environments can take up several GB once you have a few of them. So we install Miniforge into your personal folder, which has 500 GB: /zfs/omics/personal/$USER/miniforge3.
Remember, we have seen above that $USER is a variable that bash has already set for you. It contains your user name, so for you, $USER is replaced by your UvAnetID. That way, you can copy the commands below exactly as they are.
Installing Miniforge is a small job, so it is fine to run it on the login node. Run the commands one by one:
# Go into your personal folder
cd /zfs/omics/personal/$USER

# Download the Miniforge installer
curl -L -O "https://github.com/conda-forge/miniforge/releases/latest/download/Miniforge3-$(uname)-$(uname -m).sh"

# Check that the installer was downloaded
ls -lh Miniforge3-$(uname)-$(uname -m).sh

# Run the installer
# -b: install without asking any questions
# -p: define the folder to install Miniforge into
bash Miniforge3-$(uname)-$(uname -m).sh -b -p /zfs/omics/personal/$USER/miniforge3

# Check that the folder was created
ls /zfs/omics/personal/$USER/miniforge3
Here:
curl -L -O: downloads the installer, like on day 1$(uname)-$(uname -m): fills in the type of computer you work on, so that you download the installer that fits it. On Crunchomics, this becomesLinux-x86_64, so the installer is calledMiniforge3-Linux-x86_64.sh-b: runs the installer without questions. Without-b, the installer asks you to read the license and to type the folder for the installation yourself. Typing that folder by hand is easy to get wrong, which is why we give it with-pinstead- By using
-b, you accept the Miniforge license without seeing it. The installer itself has a BSD-3-Clause license, and the programs that come with it have their own licenses. Have a look at it if you want to know what you agree to
TipTip: How
uname picks the right installer (optional)
Miniforge has a separate installer for each type of computer. The installer must match two things: the operating system (the basic software that runs the computer, for example Linux or macOS) and the type of processor (the chip that does the calculations). Two commands tell you both:
# Print the name of the operating system
uname

# Print the type of processor
uname -m
On Crunchomics, uname prints Linux and uname -m prints:
x86_64In the download command, we wrote $(uname) and $(uname -m) instead of typing Linux and x86_64 ourselves. This is the command substitution from day 1: bash runs the command inside $( ) and puts its output in its place. So on Crunchomics, bash turns Miniforge3-$(uname)-$(uname -m).sh into Miniforge3-Linux-x86_64.sh.
The advantage is that the same command also works on mostother computers. On a Mac with an Apple chip, for example, uname prints Darwin and uname -m prints arm64, and Miniforge has an installer called Miniforge3-Darwin-arm64.sh. So you can use the same commands if you later want to install Miniforge on your own Mac or in WSL.
The installer has now put conda into your personal folder, but bash does not know about it yet. The next command adds a few lines to your ~/.bashrc file. This file contains settings that bash reads every time you log in. By adding the lines below, bash can find conda from now on:
# Set up conda for bash (only needed once)
/zfs/omics/personal/$USER/miniforge3/bin/conda init

# Read the new settings without logging out and in again
source ~/.bashrc

# Check that bash now finds conda and mamba
conda --version
mamba --version

# Once conda works, remove the installer and check that it is gone
rm Miniforge3-$(uname)-$(uname -m).sh
ls -l
conda init prints a long list of files, most of them with “no change”. That is fine. The output also tells you to close and re-open your shell. source ~/.bashrc does the same thing, so you don’t have to log out.
You should now see (base) at the start of your prompt. This shows that conda is active, and that you are in its base environment, the environment that comes with Miniforge.
mamba create: Make an environment with fastp
Now we can install fastp 1.4.0 into a new environment. We put the version number into the name of the environment, so that we can see later which version it contains:
# Make a new environment called fastp_1.4.0 and install fastp version 1.4.0 into it
# Press Y and Enter when mamba asks you to confirm
mamba create -n fastp_1.4.0 -c bioconda fastp=1.4.0
Here:
-n fastp_1.4.0: the name of the new environment-c bioconda: where to look for the software. Bioconda is a collection (a channel) with thousands of bioinformatics tools. You can search for tools and versions on anaconda.orgfastp=1.4.0: the tool to install, and the exact version. Without=1.4.0, mamba installs the newest version, which might be a different one the next time you run the same command
Let’s use the new environment:
# Activate the environment
conda activate fastp_1.4.0

# Check which fastp bash finds now, and its version
which fastp
fastp --version

# Leave the environment again
conda deactivate

# Check which fastp bash finds now
which fastp
When the environment is active, you see (fastp_1.4.0) at the start of your prompt, and which fastp shows a path inside your miniforge3 folder. After conda deactivate, bash finds the fastp of Crunchomics again.
Recommendations:
- Keep the base environment clean: make a new environment for each tool, instead of installing everything into base
- Always install a specific version (
tool=version), and put the version number in the name of the environment. We don’t do this for the installer itself, the newest version is fine, but in your notebook you can write down which conda version you got (conda --version) - Check the documentation of a tool for installation notes or version requirements
- List all your environments with
conda env list - Remove an environment that you no longer need with
conda env remove -n name_of_the_environment
QuestionExercise
- List all conda environments that you have now
- Activate the fastp environment again. In which folder is the fastp program located? Keep the environment active for the next section
AnswerClick me to see an answer
# Question 1:
conda env list

# Question 2:
conda activate fastp_1.4.0
which fastp
You should see two environments in the list: base and fastp_1.4.0. The fastp program itself should be in /zfs/omics/personal/username/miniforge3/envs/fastp_1.4.0/bin/fastp
NotebookNotebook checkpoint: Installing fastp
Software gets its own place in your notebook: near the top, below the short description. Someone who wants to repeat your analysis then sees right away what they need to install first.
Add a heading ## Software below the description at the top of notes.md, and below it:
- The tools that were already installed on Crunchomics, with their version (seqkit)
- Where you installed Miniforge, which conda version you got, and that you ran
conda init(only needed once) - The
mamba createcommand, and the name of the environment
fastp: Running a tool for each sample with a for-loop
With seqkit stats, we were lucky: we could give it all fastq files at once with a wildcard. Many tools don’t work this way and instead work on one sample at a time. fastp is such a tool. It removes low-quality parts of reads and leftover adapter sequences, which is called trimming or quality filtering. For paired-end data, fastp needs the R1 and the R2 file of the same sample together.
To run fastp on all our samples, we combine three things from day 1: cut to make a list of samples, a for-loop to repeat the command for each sample, and a script file to run the loop as a job. We build the loop step by step, and look at what happens after each step.
If it is not active yet, activate the conda environment with fastp that we made in the previous section:
conda activate fastp_1.4.0Step 1: Run fastp on one sample
Before we write a loop, we run the tool on a single sample. This shows us what fastp needs as input and what it produces. Like for every new tool, start with the help page:
# Go back to our data_analysis folder
# Remember: We switched to the personal folder when we installed conda
cd /zfs/omics/personal/$USER/data_analysis

# View the help for fastp
fastp --help
Now let’s run fastp on Sample-DUMMY1:
# Make a folder for the fastp results
mkdir -p results/fastp

# Run fastp on the R1 and R2 file of the first sample
srun --ntasks=1 --cpus-per-task=2 --mem=5G --time=00:30:00 fastp \
    -i data/seq_project/barcode001_User1_ITS_1_L001/Sample-DUMMY1_R1.fastq.gz \
    -I data/seq_project/barcode001_User1_ITS_1_L001/Sample-DUMMY1_R2.fastq.gz \
    -o results/fastp/Sample-DUMMY1_R1.trimmed.fastq.gz \
    -O results/fastp/Sample-DUMMY1_R2.trimmed.fastq.gz \
    --thread 2

# Check what fastp made, in the results folder and in the current folder
ls -l results/fastp
ls -l
This command is long, so we split it over several lines to make it more readable. The \ at the end of a line tells bash that the command continues on the next line. Be careful: the \ must be the very last character on the line, so don’t add a space after it.
Here:
-iand-I: the R1 and R2 input files-oand-O: where to write the trimmed R1 and R2 files--thread 2: let fastp use 2 CPUs, the same number that we requested from SLURM with--cpus-per-task=2
When fastp is done, it prints a summary to the screen. It shows, for example, how many reads there were before and after filtering.
Now look at the output of the two ls commands. The trimmed files are in results/fastp, as we asked. But fastp also made two reports, fastp.html and fastp.json, and put them in the folder we ran the command from. We never asked for these names and fastp uses them by default. If we now ran fastp on the next sample, it would write its reports under the same names, and overwrite the reports of Sample-DUMMY1.
This is why it is worth running a tool on one sample first and looking carefully at the help page and the generated outputs. In the help page, we find the options -h and -j to choose the names of the two reports ourselves and we will use them in the loop below. The reports in the current folder are not needed anymore, so we remove them:
# Remove the two reports with the default names
rm fastp.html fastp.json

# Check that they are gone
ls -l
Step 2: Make a list of samples
Our loop will repeat fastp once per sample, so we need a list with the 4 sample names. We build this list from the file names with cut, step by step:
# List the R1 files only. Each sample has exactly one R1 file, so each sample is listed once
ls data/seq_project/*/*_R1.fastq.gz

# Keep only the file name: the 4th field when we split the path at each /
ls data/seq_project/*/*_R1.fastq.gz | cut -f4 -d "/"

# Keep only the sample name: the 1st field when we split the file name at each _
ls data/seq_project/*/*_R1.fastq.gz | cut -f4 -d "/" | cut -f1 -d "_"
The last command prints exactly the list we want, so we can now store it in a file:
ls data/seq_project/*/*_R1.fastq.gz | cut -f4 -d "/" | cut -f1 -d "_" > samples.txt

# Check the list: we expect 4 sample names
cat samples.txt
wc -l samples.txt
A list file like samples.txt has a few advantages. You can open it and see exactly which samples the loop will work on. And if you later want to rerun only some samples, you can make a shorter list without changing the loop.
TipTip: Making a list file by hand (optional)
You can also type a list file yourself, one sample name per line. Use nano for this, not Notepad or Word. As we saw on day 1, Windows programs add an invisible character at the end of each line. In a list file, this character becomes part of each sample name, and the loop then looks for files that don’t exist.
Step 3: Build the loop with echo
Like on day 1, we start with a loop that only prints what it works on:
for sample in $(cat samples.txt); do
    echo $sample
done
This should print the 4 sample names. Let’s look closer at $(cat samples.txt). cat samples.txt prints the content of the file. The $( ) around it takes this printed text and puts it into the command, at the place where it stands. This is the command substitution we already used on day 1. So for bash, the first line becomes for sample in Sample-DUMMY1 Sample-DUMMY2 Sample-DUMMY3 Sample-DUMMY4; do.
Important: Bash splits the text from samples.txt at every new line, but also at every space. So each line in the list file must contain one name, without spaces.
Next, we check that we find the right input files for each sample. We use ls instead of echo, because ls shows us which files the wildcard actually matches:
for sample in $(cat samples.txt); do
    echo "Sample: $sample"
    ls data/seq_project/*/${sample}_R1.fastq.gz
    ls data/seq_project/*/${sample}_R2.fastq.gz
done
Each ls should print exactly one file. This is the moment to check what your wildcard matches. Imagine you had sequenced Sample-DUMMY1 twice, and had two folders with a Sample-DUMMY1_R1.fastq.gz file. Then the wildcard would match both files, and fastp would get the wrong input. Always look at what a wildcard matches before you give it to a tool.
Notice that we write ${sample}, with curly brackets, and not $sample. The curly brackets show bash where the variable name ends. Without them, bash reads $sample_R1 as a variable called sample_R1. That variable doesn’t exist, so bash quietly replaces it with nothing, and the path becomes data/seq_project/*/.fastq.gz. Bash does not give an error for this. Use the curly brackets whenever text follows directly after a variable name.
Step 4: A dry run of the full command
Now we put the whole fastp command into the loop, but with echo in front of it. Bash then prints each command instead of running it. We add -h and -j to give each sample its own reports.
Note:
- here
-hstands for html, not help. The same letter can mean different things in different tools, so always check the help page. - the command below uses
threadwith seqkit we usedthreads. Different tools often have different convention for how things are named and this is another example for always carefully checking the help page.
for sample in $(cat samples.txt); do
    # print an empty line between the commands
    echo ""

    # Dry run for our command
    echo fastp \
        -i data/seq_project/*/${sample}_R1.fastq.gz \
        -I data/seq_project/*/${sample}_R2.fastq.gz \
        -o results/fastp/${sample}_R1.trimmed.fastq.gz \
        -O results/fastp/${sample}_R2.trimmed.fastq.gz \
        -h results/fastp/${sample}.html \
        -j results/fastp/${sample}.json \
        --thread 2
done
This prints 4 fastp commands, one per sample. Read them carefully: do the R1 and R2 input files belong to the same sample? Does every sample get its own output names? If something looks wrong, it is much easier to fix it now than after the job has run.
ImportantImportant: Don’t put quotes around a path with a wildcard
In scripts that you find online, or that an AI tool writes for you, variables are often written in quotes, for example "$sample". That is a good habit in general. But be careful with wildcards. Inside quotes, bash does not replace the * with the matching file names. With -i "data/seq_project/*/${sample}_R1.fastq.gz", fastp would look for a folder that is literally called *, and stop with an error.
That is why we write the input paths without quotes, directly in the fastp command. Our names contain no spaces, so this is safe here.
Step 5: Run the loop as a job
The loop works, so we can run it for real. Our 4 samples are small, but with real data this can take hours, so we submit the loop as a job with sbatch. Create a new script:
nano scripts/fastp.shAnd add the following content:
#!/bin/bash
#SBATCH --job-name=fastp
#SBATCH --output=logs/fastp_%j.out
#SBATCH --error=logs/fastp_%j.err
#SBATCH --ntasks=1
#SBATCH --cpus-per-task=2
#SBATCH --mem=5G
#SBATCH --time=01:00:00

# Make conda available in the job, and activate the environment with fastp
source ~/.bashrc
conda activate fastp_1.4.0

# Make the output folder (no error if it already exists)
mkdir -p results/fastp

# Run fastp on the R1 and R2 file of each sample in samples.txt
for sample in $(cat samples.txt); do
    echo "Start fastp for: $sample"

    fastp \
        -i data/seq_project/*/${sample}_R1.fastq.gz \
        -I data/seq_project/*/${sample}_R2.fastq.gz \
        -o results/fastp/${sample}_R1.trimmed.fastq.gz \
        -O results/fastp/${sample}_R2.trimmed.fastq.gz \
        -h results/fastp/${sample}.html \
        -j results/fastp/${sample}.json \
        --thread 2
done

echo "fastp job finished on:"
date
Save and exit with Ctrl+X, Y and Enter.
The loop is the same as in our dry run, only without echo in front of fastp. Two parts are new compared to the seqkit job script:
source ~/.bashrcandconda activate fastp_1.4.0: a job starts in a fresh environment on a compute node, where conda is not set up yet.source ~/.bashrcruns the settings from your~/.bashrcfile, which include the setup of conda. After that, we can activate the environment with fastp.echo "Start fastp for: $sample": writes the sample name into the log file before fastp starts. If something goes wrong, you can see in the log at which sample it happened.
Submit the job and follow it:
# Submit the job script to SLURM
sbatch scripts/fastp.sh

# Check the job status
squeue -u $USER

# Once the job is done, look at the log files
cat logs/fastp_*.out
less logs/fastp_*.err
fastp prints its summary for each sample into the log files. Have a look at both of them.
Step 6: Check the output
Never assume that a job did what you wanted, just because it finished. We gave 4 samples to fastp, and for each sample we expect 2 trimmed files, 1 HTML report and 1 JSON report:
# Look at the output files
ls -l results/fastp

# Count them: we expect 4 samples x 4 files = 16 files
ls results/fastp | wc -l
Also check that none of the files is empty (a size of 0 in the ls -l output), and that each sample name appears in the .out log.
QuestionExercise
- Copy the 4 HTML reports to your own computer and open the report for Sample-DUMMY1. Remember that on your computer you can use
explorer.exe .(Windows) andopen .to open the folder you are to get easy access to the HTMLs you just downloaded. - On day 1, we counted the lines in each fastq file (
results/counts/line_counts_bash.txton your own computer). How many reads did Sample-DUMMY1 have before filtering? Does this match the number in the fastp report? - Count the lines in
results/fastp/Sample-DUMMY1_R1.trimmed.fastq.gzon Crunchomics. How many reads are left after filtering?
AnswerClick me to see an answer
# Question 1:
# Run this in the terminal on your OWN computer, from inside your local data_analysis folder
mkdir -p results/fastp
scp 'username@omics-h0.science.uva.nl:/home/username/personal/data_analysis/results/fastp/*html' results/fastp/

ls -l results/fastp

# Question 2:
# On your own computer we get 179 384
grep -A 1 "Sample-DUMMY1" results/counts/line_counts_bash.txt

# Question 3:
# On Crunchomics we get 177 400
zcat results/fastp/Sample-DUMMY1_R1.trimmed.fastq.gz | wc -l
For question 2: each read takes up 4 lines in a fastq file, so the number of reads is the number of lines divided by 4. For example, Sample-DUMMY1_R2.fastq.gz has 179 384 lines, which is 44 846 reads. R1 and R2 of the same sample always have the same number of reads. The fastp report shows the number of reads before filtering for R1 and R2 together, so you should find twice this number there.
For question 3: the number should be the same as, or smaller than, before filtering. Compare it with the number of reads after filtering in the fastp report. For my run, I see 177 400 lines. This means that we now work with 44 350 reads, telling us that fastp removed 496 read pairs.
NotebookNotebook checkpoint: Quality filtering with fastp
Add a new heading ## Quality filtering with fastp to notes.md, and below it:
- The command that made
samples.txt, and the check - The
sbatchcommand with a comment that names the script, and below the code block, the job ID - The checks on the output: what you expected and what you saw
- The
scpcommand that copied the reports to your computer (remember:# On my computer) - Below the code block, in your own words: what did the fastp report show for Sample-DUMMY1? How many reads were there before and after filtering? Did anything surprise you?
The test run on one sample was a detour, so you don’t need its commands. One sentence on what it taught you is enough, for example that fastp writes its reports to fastp.html and fastp.json unless you give other names.
TipTip: Comparing reads before and after trimming (optional)
At the start of the day, we made a table with seqkit stats for the raw reads. If we make the same table for the trimmed reads, we can see what fastp changed:
# Run seqkit stats on the trimmed reads
srun --ntasks=1 --cpus-per-task=1 --mem=5G --time=00:30:00 seqkit stats -b -a -T -o results/seqkit/stats_trimmed.txt results/fastp/*trimmed.fastq.gz --threads 1

# Check the output: we expect a header line and 8 lines, one per trimmed file
wc -l results/seqkit/stats_trimmed.txt
cat results/seqkit/stats_trimmed.txt
Both tables have many columns, which makes them hard to compare by eye. On day 1, we used cut to select columns. Here, we take a brief look into awk, a small programming language for working with tables in text files. awk reads a file line by line, splits each line into columns, and lets us choose what to do with each line.
Let’s print the file name, the number of reads and the average read length (columns 1, 4 and 7) of both tables:
awk -F'\t' 'FNR > 1 {print $1, $4, $7}' results/seqkit/stats_raw.txt results/seqkit/stats_trimmed.txtHere:
-F'\t': the columns are separated by tabs (\tstands for a tab)'...': the awk program, in single quotes so that bash does not change anything in itFNR > 1: only work on lines with a line number above 1. This skips the header line.FNRis the line number within the current file, so the header is skipped in both files{print $1, $4, $7}: print columns 1, 4 and 7. In awk,$4means “column 4”. This is not the same as a bash variable- We give awk two files, and it works through them one after the other
This prints 16 lines: first the 8 raw files, then the 8 trimmed files. Compare the number of reads and the average length of Sample-DUMMY1 before and after trimming.
TipTip: Finding R2 without a list file (optional)
For those who want to learn more bash: we can also write this loop without samples.txt. We then loop directly over the R1 files, and let bash work out the matching R2 file and the sample name:
for R1 in data/seq_project/*/*_R1.fastq.gz; do
    R2=${R1/_R1/_R2}
    sample=$(basename $R1 _R1.fastq.gz)
    echo "Sample: $sample, R1: $R1, R2: $R2"
done${R1/_R1/_R2}: takes the value ofR1and replaces the first_R1with_R2. This turns the path to the R1 file into the path to the R2 filebasename $R1 _R1.fastq.gz:basenameremoves the folders from a path and keeps only the file name. If you give it an ending as second argument, it removes that ending too. What is left is the sample name$( ): the command substitution from above stores the output ofbasenamein the variablesample
This is shorter, but you need to know the extra syntax to read it. A list file is easier to check, and easier to change if you want to run only some samples.
If your list file has several columns, for example a sample name and a group, a while loop can read both columns into separate variables. The IBED for-loops page explains this, and builds a loop step by step with another example.
Wrapping up day 2
Your analysis now lives in two places: the data, results and job scripts on Crunchomics, and the notebook on your own computer. The notebook mentions the job scripts, so let’s copy them next to it. Run this in the terminal on your own computer:
# Run this on your OWN computer, inside your local data_analysis folder
# Replace both instances of 'username' with your UvAnetID
scp 'username@omics-h0.science.uva.nl:/home/username/personal/data_analysis/scripts/*.sh' scripts/

# Check: we expect count_lines.sh from day 1, and seqkit.sh and fastp.sh from today
ls -l scripts
As in the fastp exercise, the quotes around the path stop your own computer from using the wildcard, so that Crunchomics can use it to find the files.
NotebookNotebook checkpoint: Tidy your notebook (day 2)
- Add the
scpcommand that copied the scripts to your notebook - Update the description at the top of
notes.md, so that it covers both days - Check that your notebook explains every file and folder in your project on Crunchomics. Run these inside
~/personal/data_analysis:ls,ls results/*andls scripts logs. Can you tell which log file belongs to which job? - Compare your notebook with my example notebook. What does it have that yours doesn’t? Is there anything you want to add?
You now know enough to write and, just as important, to check your own code. Many of you will also use AI chat tools such as ChatGPT or UvA AI Chat for coding. On the page Using LLMs, I describe how I suggest you use them: as a tutor that explains code, and always with the checks from these two days. You can read it after the workshop, at your own pace.
Going further
TipTip: Running many samples in parallel with job arrays (optional)
Our fastp loop runs inside a single job, so the samples are processed one after another. With 4 small samples, that is fine. With hundreds of samples, it can take a long time, while the HPC has enough CPUs to run several of them at the same time.
So let’s run fastp again, but this time with one job per sample. How would we run such jobs efficiently?
We can use a job array, which allows us to:
- Run several jobs with the same settings: the same CPUs, memory and software
- Run these jobs in parallel (at the same time), instead of one after the other
We already have a list with one sample name per line, samples.txt, which we made for the fastp loop. Check that it is still there:
# Check the list: we expect 4 sample names
cat samples.txt
wc -l samples.txt
Next, we use this text file in our job array. Store the following in scripts/fastp_array.sh:
#!/bin/bash
#SBATCH --job-name=fastp_array
#SBATCH --output=logs/fastp_array_%A_%a.out
#SBATCH --error=logs/fastp_array_%A_%a.err
#SBATCH --array=1-4
#SBATCH --ntasks=1
#SBATCH --cpus-per-task=2
#SBATCH --mem=5G
#SBATCH --time=01:00:00

# Make conda available in the job, and activate the environment with fastp
source ~/.bashrc
conda activate fastp_1.4.0

# Make a new output folder, so that we don't overwrite the results of the loop
mkdir -p results/fastp_array

# SLURM_ARRAY_TASK_ID is set by SLURM: 1 for the first job in the array, 2 for the second, and so on
# Read the sample name on that line number of samples.txt
# -n tells sed not to print every line, and 1p prints line 1
sample=$(sed -n "${SLURM_ARRAY_TASK_ID}p" samples.txt)

# Print what is happening
echo "Now job ${SLURM_ARRAY_TASK_ID} runs fastp for: ${sample}"

# Run fastp on the R1 and R2 file of this one sample
fastp \
    -i data/seq_project/*/${sample}_R1.fastq.gz \
    -I data/seq_project/*/${sample}_R2.fastq.gz \
    -o results/fastp_array/${sample}_R1.trimmed.fastq.gz \
    -O results/fastp_array/${sample}_R2.trimmed.fastq.gz \
    -h results/fastp_array/${sample}.html \
    -j results/fastp_array/${sample}.json \
    --thread 2
In the script, we use some new SLURM options:
#SBATCH --array=1-4: sets up a job array with 4 jobs, numbered 1 to 4. We choose 1-4 because we have exactly 4 samples insamples.txt#SBATCH --output=logs/fastp_array_%A_%a.out:%Ais replaced by the job ID that SLURM assigns, and%aby the number of the job in the array--cpus-per-task,--memand--timenow apply to each job in the array. So every sample gets 2 CPUs, 5G of memory and up to 1 hour- Important: do the individual jobs in your array use a lot of CPUs or memory? Then you might not want to run all of them at the same time. With
#SBATCH --array=1-4%2, SLURM runs at most 2 jobs at the same time, and starts the next ones when these have finished. Try to use no more than ~20% of Crunchomics at the same time.
The script does the following:
SLURM_ARRAY_TASK_IDis a variable that SLURM sets for us in each job of the array. It holds the number of the current job: 1 for the first job, 2 for the second, …, and 4 for the last one. We don’t create this variable ourselves, we only use itsed -n "${SLURM_ARRAY_TASK_ID}p" samples.txtprints one line ofsamples.txt: line 1 for job 1, line 2 for job 2, and so on. We store this sample name in the variablesample. For the first job, this isSample-DUMMY1echorecords which job works on which sample- Finally, we run fastp on the R1 and R2 file of this sample. The fastp command is the same as in our loop, but there is no loop around it: each job handles only one sample. Each job writes its own files, named after its sample, so the 4 jobs don’t overwrite each other’s output
Compare this with the loop in scripts/fastp.sh. In the loop, bash goes through samples.txt line by line inside one job. In the array, SLURM starts one job per line, and each job picks its own line with sed.
Before we submit the script, let’s check that sed picks the right sample. SLURM_ARRAY_TASK_ID only exists inside an array job, so we test the line selection on the login node with a number in its place:
# Which sample would job 1 get? And job 4?
sed -n "1p" samples.txt
sed -n "4p" samples.txt

# Compare with the full list
cat samples.txt
Each sed command should print exactly one sample name: the first and the last line of samples.txt. Testing a small part of a script like this takes seconds, and it is much faster than finding a mistake in the log files of 4 jobs.
Submit the script with sbatch scripts/fastp_array.sh. If you check what is happening right after submitting with squeue, you see one line per job in the array, with the array number after an underscore in the job ID (for example <jobID>_1).
In the logs folder, you get an output and an error file for each job in the array. In each output file, you see the message from echo, for example Now job 1 runs fastp for: Sample-DUMMY1. The fastp summary for each sample is in the log files of its job.
Check that each job wrote its files:
# We expect 2 log files per job, so 8 in total
ls -l logs/fastp_array_*

# We expect 4 files per sample (2 trimmed files, 1 HTML and 1 JSON report), so 16 in total
ls -l results/fastp_array
ls results/fastp_array | wc -l
More about arrays and other SLURM options can be found on the IBED SLURM basics page.